One thing that I read about in the late 1950s has stuck with me. I don't see it used or even talked about, which is surprising. It's immensely useful for backpacking.
What I read about was how to moor a boat using a real rope and a piece of rubber rope.
Rubber rope is a thing I've never seen, but it's the idea that counts. The same idea in the world of backpacking shelters works out to be what's called "shock cord", which is just an elastic core wrapped in fabric.
You tie some of this into the middle of a guyline for a tent, or a tarp, or a hammock tarp, and leave a little slack in the real guy line, and this lets the tent or tarp move a little, give a little in the wind, like a flexible tree bending a little, but not snapping off.
The thing is, it's hard to fasten a length of plain shock cord so it stays tied. All knots in the stuff eventually work loose.
Well, you can run this stuff through a little soft metal tube and then crimp the tube, but where do you get super lightweight metal tubing about 1/8" in diameter, in like 1" segments? (3mm by 25mm) There are things like this made for exactly this purpose, but you don't see them just sitting around in every store, and it's baffling what a guy could use as a substitute, so I've been stumped.
Yeah, so today while buying groceries and letting myself be open for ideas about whatever, and also to kill time, I blithely wandered through the women's doodad section at the supermarket and had a nice bingo moment.
Goody. Goody Ouchless Hair Elastics and Goody Ponytail Holders. Yep. Them's things, and they were there. Just about what I wanted, and all ready-made. Cheap too.
Goody.com doesn't have details. You have to follow the links from there to Walmart or Target and check them, and that's where I stole the images you see here. Too good not to steal.
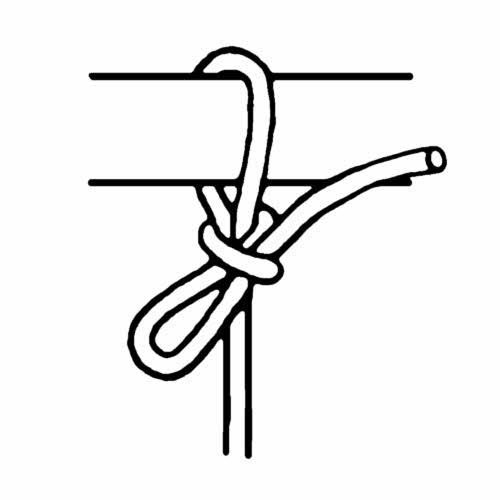
I made a dumb graphic (right below) showing how to use elastic with guylines and it shows way too much slack, but I'm not going to do it over, so use your imagination. And what looks like a knot on each side should be in red. Or something. The graphic should be clearer, but I'm not a pro, hey. (Another D'Oh! moment, brought to you by me.) But it's the idea that counts, and this is one idea that is really fine. Think about it. I believe you've even caught on already. The elastic stretches just so far under heavy stress, and then the actual guyline takes over. Brilliant, as they say.
Guy line with elastic tensioner, showing way too much slack.
Ouchless hair elastics.
Ouchless hair elastics showing thickness.
Ponytail holders.
One ponytail holder, showing "welded" ends — no knots, no crimping, etc. Woot!
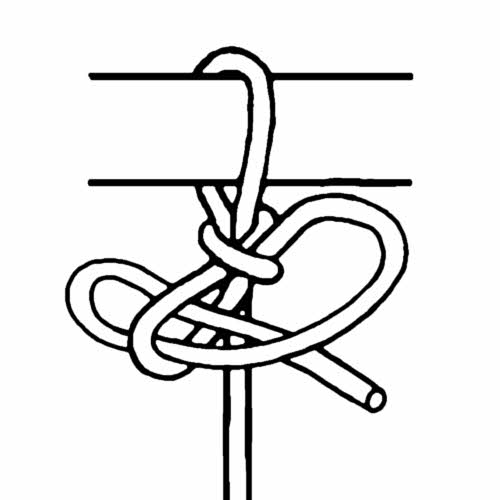
Updated tensioner graphic. More schematic but possibly no clearer. At least I tried, eh?
Have anything worth adding? Then try sosayseff@nullabigmail.com
Me? Still trying after all these years.
Etc...
so says eff: sporadic spurts of grade eff distraction definitions: outdoor terms fiyh: dave's little guide to ultralight backpacking stoves boyb: dave's little guide to backpacks snorpy bits: nibbling away at your sanity last seen receding: missives from a certain mobile homer noseyjoe: purposefully poking my proboscis into technicals
I'm not into knots. They confuse me. I can't remember how to tie them. I think that a part of my mind never switched on, the part that handles topology. (Hey – it's even hard to pronounce.)
But they are essential, knots. Truly. As in holding up your hammock, if you use a hammock, which I've been doing for over ten years now. There are lots of advantages and disadvantages to hammocks as shelters, but the overwhelming plus, for me, is that I can sleep in one without pain. I can't do that while sleeping on the ground, any more, so that argument is over for me.
But how do you keep the damn thing up all night, and then (almost more important), how do you get the hammock down again the next morning?
It's easy to tie a knot that will hold, but not so easy to tie one that is a snap to undo, which is why there is a whole minor industry around machining bits of hardware that obviate the need to tie much of anything resembling a knot, where hammocks are concerned.
I've never invested in any of this, but haven't ever been happy with my usual attempts at knots either. Until recently.
I think I've got it now, and it's too simple to believe.
First, a knot I can tie.
Second, a knot that I don't forget how to tie from one day to the next.
Third, a knot that is trivially easy to tie.
Fourth, a knot that always holds, and...
Fifth, a knot that comes undone with one pull.
Too good to be true? Yep. Except that it is true.
It's called just the slip knot, or maybe a slippery half hitch, and possibly some other names.
The trick is to use two of them, and pull them both tight. The first one holds the load and the second one locks the first one. Simple. It takes about ten seconds to tie both knots, and about two seconds (or less) to yank them both out again. And in between, they hold.
Now I use this knot not only to suspend my hammock but in guying out the rain fly, hanging my food bag, and for basically any other situation requiring a knot that has to hold, has to release easily, and might have to be re-done during the night in order to take up any slack that develops.
You could even tie this knot with your eyes closed, by touch alone.
Unfortunately, I'm not good enough with any software to create a decent illustration of this knot, but what I've got here probably gets the point across. The only key part isn't tying the knot but adding the second knot to lock the first one.
Topology n. (1) The study of the properties of geometric figures or solids that are not changed by homeomorphisms, such as stretching or bending. Donuts and picture frames are topologically equivalent, for example. (2) A collection C of subsets of a set X such that the empty set and X are both members of C and C is closed under arbitrary unions and finite intersections. (3) In topology, knot theory is the study of mathematical knots. While inspired by knots which appear in daily life in shoelaces and rope, a mathematician's knot differs in that the ends are joined together so that it cannot be undone. In mathematical language, a knot is an embedding of a circle in 3-dimensional Euclidean space, R3 (Note that since we're using topology the concept of circle isn't bound only to the classical geometric concept, but to all of its homeomorphisms). <= See? Confoozling, right?
I just completed a four day backpacking trip to Mt St Helens. I wanted to go have another look at a place I got to last year. Which I did, sort of, but with snow pack at two to three times normal, the end of June this year is not a third of the way through backpacking season, but pre-season.
A few years back, I drove in on April 30 and went hiking anywhere I wanted. The only snow then was up where only climbers would go, not anywhere that sane hikers would have trouble with it.
And so it was for the first several years that I spent exploring the area.
No longer. This is the fourth year running that heavy snow has pushed the hiking season out toward autumn. It looks like the window for real backpacking will again be only two or three weeks long.
Lumpy and snowy and foggy.
Bummer.
But it wasn't all bad this trip because I was expecting to deal with snow. Not so much, but some.
I also knew that where I'd be going I'd have no chance to use my hammock.
In places there are trees tall enough and thick enough to support a hammock, but those trees grow in only a few spaces. They are bushy, hard to hang from. And their trunks are covered with blisters that pop open under pressure and ooze a thick, sticky sap that smells like turpentine.
Transparent. Nice in the moonlight. A real dew-catcher.
The smell is fine. It's a strong, clean smell, but the stickiness isn't.
Get this stuff on your hands and it won't come off. Get it on the suspension of your hammock and it's worse. It hardens and though alcohol will remove it from hands, and spots of it from clothing, if your hammock suspension gets saturated with it, you have to let it harden and just live with it.
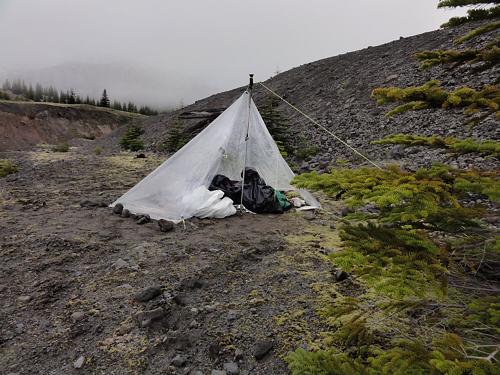
So anyway, I had a piece of plastic I wanted to play with. I used it once as an 8x10 tarp, then cut it down to make a sort of tent-like shelter. I took that.
As a backup I took my home-made Brawny Shelter, a.k.a. Dancing Light Gear Tacoma.
Seemed to keep the werewolves away too.
The short of it: I missed the hammock. A lot.
I'm way past the days when I can sleep on the ground comfortably. A couple of years ago I talked to Ron Moak of Six Moon Designs, who said that he doesn't even use a sleeping pad. Apparently just a waterproof sheet beneath him, and he gets by OK.
Could have been pitched better though.
Go, Ron.
I have enough wrong with my back, plus a heap of years piled on top that I can't sleep more than two hours on the ground without awakening from the pain. In a hammock I can just snore my way through the whole night.
Night two. Slight clearing.
But hammocks aren't perfect either.
A big hammock tarp will catch the wind. A smaller tarp catches less wind but gives less protection from both wind and rain. Being above ground level you're up higher where there is more wind. This is colder, and hammock insulation is tricky.
You are also tree-dependent. You need the right size and type of trees, and need two that are just far enough apart, and oriented right so you can protect yourself from wind and weather.
Hammocks are places to sleep, not homes. You can't wait out a day-long storm in a hammock. You can't really change clothes in one, and can't spread out your gear for convenience or for anything else. You also have more limited sleeping positions. No sleeping on your stomach, and though sleeping on your side is possible it isn't that convenient.
Not as lumpy. Almost grassy.
But there are huge positives too.
A hammock is independent of the ground. You can sleep over rocks, mud, logs, or trickles of water. You are above the night-dampness. In tree country you have many more potential camp sites, even on severe slopes, and you stay well above critters like ants, spiders, centipedes, mice, wood rats, ground squirrels, snakes, and skunks.
Setup is simple. As is takedown.
I have a fabric tube (which Tom Hennessy calls "snakeskins") that I carry the hammock in. After stringing it up, I slide this off the hammock, and unfurl the tarp. Takedown goes the other way -- I just slip this tube back over the hammock and tarp, and I have all the loose ends magically contained in a long, loosely packed bundle that's easy to arrange in the pack.
You can't be this messy with a hammock.
Using single-wall tents the last few days I had a chance to refresh myself on dealing with them.
Setup is annoyingly complicated. If I had to use a tent all the time I'd get a freestanding tent or design one. Fumbling with stakes and line three nights running made me crazy. Keeping track of the pieces too. It's really easy to lose one or more stakes any time. The lines always get tangled.
Finding a place to pitch a shelter is insane. The ground is either lumpy or at too great a slope or both, and if you find a place that works, it may be too exposed to weather or too crowded by trees and shrubs, or you have to orient the shelter facing the wind rather than away from it. You usually end up sleeping on some odd slope, either sliding or rolling downhill in your sleep.
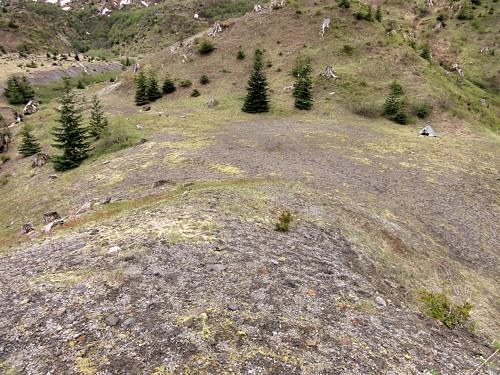
Tent on lonesome flat, at top right.
Critters can just walk right in.
And it's damp. I had extremely heavy condensation all three nights. The ground was damp, the air cool and damp, dew collected on everything, and I was right in the middle of it. Ventilation was no help.
In the morning I had a dripping, slimy, grit-covered shelter and dangling stray lines to fold and pack away. By the next evening I had a still-dripping, slimy, grit-covered shelter to set up again, except that all the lines had gotten tangled.
For those who like sleeping on the ground, though, a carefully-chosen shelter can be the lightest way to go by far. You don't depend on finding the right trees in the right area. You have a wider variety of shelters to choose from, and you can get one at almost zero cost if using plastic sheeting, though that option is heavier than modern fabrics.
Slight clearing that later became more mist.
Tent-like shelters are easier to understand, and more familiar, and can sleep two, or three, or four at a time. They are also easier to repair, and to work around in case there is some kind of catastrophic failure. Rip the bottom of your hammock and you're screwed. Rip your tent and you can at least use the remaining part as a waterproof blanket.
Ultimately it comes down to what a person likes and can deal with.
I've done both. I'm glad I've had the experience of using a hammock and look forward to getting back to it on the next trip.
That's me. Other people like other things and that's fine too. I'm glad we have choices.
See tabs at the top for definitions and books.
Have extra info to add?
If the commenting system is out again, then email sosayseff@nullabigmail.com
Me? Recently nominated for this year's Doofus Awards. (Next year's too.)
A while back I did a post on making a hammock underquilt.
Since I didn't have all week to produce good illustrations I faked it. Overall it was crude but sort of effective, except for one part: how the hammock and the underquilt hook together.
Well, believe it or not someone wanted to know more. Although what I've got works, it's more like a good idea for a prototype than anything else. In other words, I made the hammock, the underquilt, and invented my own way of attaching the two, which does work, and is better than what I had before, but is still pretty crude.
Did I mention crude? OK, only three times so far.
Most underquilt configurations I've see illustrated use what I tried first, which is an anchor on each end of the hammock, with a line on each side of the hammock and elastic in there somewhere. I used shock cord for the whole length, and sewed a fabric tube on each side of the underquilt, running the shock cord through that.
1. The basic idea (enlarge for a better view.)
Pull the shock cord tight and the underquilt snugs up against the bottom of the hammock. Hypothetically. Sometimes not so well. But mostly. Loosy-goosy.
Given the geometry, with a long run of cord on each side of the hammock, sag is inevitable and slop is assured. The solution is more tension. If that doesn't help enough, get heavier shock cord, restring, and do over.
Then when you get out of the hammock it all scrunches and puckers into a ball.
Then there is the Hennessy Problem.
Say you get back into bed and notice that you are warm from your spine left. Your spine, your left shoulder and buttock, and points higher, which, of course, belong only to your astral body, not the physical one. If you are deft you can sometimes pinch through the hammock fabric, grab the underquilt and painstakingly slide it back under you.
But not always.
If not you get out of the hammock, putting your shoes on, stuffing the sleeping bag behind you as you go, so it doesn't come along and end up on the ground, and do the readjustment, get back in (carefully), and finally pass out after you are done swearing.
Since the Hennessy design has its entryway at the bottom of the foot end, you can't simply reach over one side and tug things into alignment as with the older style of hammock.
OK.
Then the other thing. (No, I'm not done yet.)
The other thing.
Sometimes after watering the night-blooming flowers you get back to bed as before, have your shoes hanging up by a string from the ridge line, have put your sleeping had on, got your gloves on, have struggled to get back into your sleeping bag if it's too cold to use it as a quilt, are all zipped up and are sweating only moderately, and then you notice that your whole back seems oddly cool.
You figure that it will pass in a moment, and try to sleep. No. You really knew better but it's always better to make a denial first, pretend you can make it all go away, and only deal with things when there is no alternative.
Eventually you realize that the entire underquilt, because of its suspension system, got off to one side when you climbed back into the hammock. This is in fact the worst case, short of being hit by lightning or having something with an enormous tooth-filled mouth come by to see if you are tasty.
Since the underquilt isn't positively attached to the hammock and is under a lot of elastic tension, it can snake around, silently going sproing off one side while you are getting into the hammock, even though you made sure to align it all before putting any weight on it.
Nothing to do but get all the way out, rearrange things, and try again.
You are always more careful the second time, but still you get the underquilt decentered, sometimes, in case you have not already exceeded your profanity limit for the night.
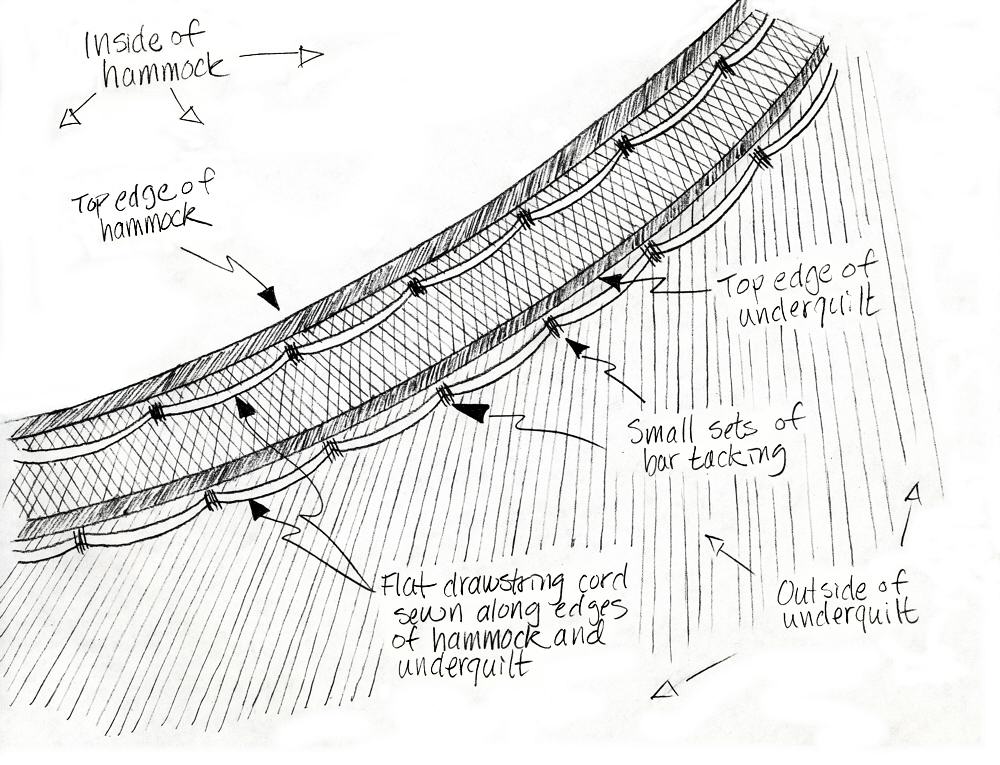
So what I did when making a whole new hammock was to sew loops along both sides of the hammock, and similar loops on the sides of the underquilt. Then I threaded shock cord through the loops: up, over, down, under, up, and so on. Each side got the same treatment.
2. Same as above, but with shock cord (enlarge, OK?).
I put a cord lock on each end of the shock cord and made sure to add big knots to secure the cord locks. And I used plenty of shock cord, so I could throw in as much slack as I needed to, and then some.
The head and foot end of the underquilt were the same as before, each with a separate length of shock cord through its own sewn-in fabric tube. This lets me pucker the head end or the foot end of the underquilt, to get it snug there.
So what I have now works a bit like shoelaces, or a grommeted tarp on a pickup truck. There is one line of shock cord on each side of the hammock, holding up the underquilt, and I can let the quilt hang down low or snug it as tight as I want. And it never moves around.
Both sides of the underquilt come all the way up the sides of the hammock, less an inch or two, and they stay there. The head end and foot end are nicely closed off, and I stay cozy.
I swear less on the trail now, so I have to do that at home. But at home I have beer and cookies for refreshment. Could be worse.
Note on the illustrations (in case you were wondering what they were): Granted, they are not good by any means, but I think they show the details well enough for anyone else to either have a good laugh or to get the idea so they can make something similar, but, of course, better. Cuz y'all are smarter than me anyhow. I know that and goodonya besides.
Run with it.
See tabs at the top for definitions and books.
Have extra info to add?
If the commenting system is out again, then email sosayseff@nullabigmail.com
Me? Busy getting requilted.
If you sleep in a backpacking hammock you know how comfortable it is.
If you haven't there is nothing anyone can say to make you understand how comfortable it is. Simply beyond words.
If you can't sleep on the ground any more you have no choice anyway, other than giving up backpacking. This is pretty well my case, partly because of the back I was born with and partly because of creakiness as I get older. Can't help it.
But.
There is a problem with backpacking hammocks. Their undersides are hard to insulate. You notice this the first time you get into a hammock.
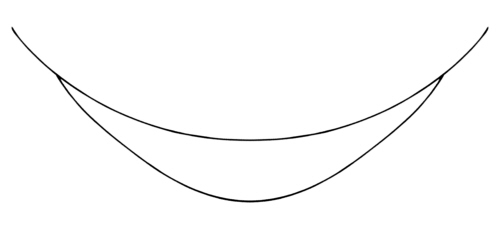
Yer basic hammock
Just about everyone first tries using a normal sleeping pad. One intended for sleeping on the ground.
This is great except that it doesn't work. It doesn't work because normal sleeping pads (sleeping mats, mattresses) are too narrow and rigid. Sure, they are flexible but not flexible enough. To work they would have to bend along two axes at once, head-to-toe and side-to-side, and they can't to this. They buckle and bunch up.
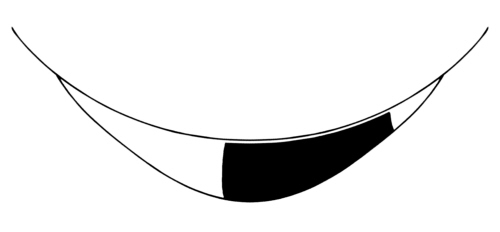
Hammock with minimal underquilt in place.
Any anyway, they're too narrow. Most are 20 inches by 48 inches (51 by 122 cm). The length is fine. The width is not. You need at least 36 inches of width, and even that is sketchy. Let's say 40 to 42 inches (102 to 107 cm) wide.
Why?
Because.
Because that's how much you need. You need insulation that's wide enough to wrap around you.
Part of it is under you and the rest goes around your sides. Another thing you quickly learn is that having your major body parts insulated is not enough. You need all of them insulated.
Lying in a hammock with even one knee in contact with the uninsulated side of the hammock is enough to keep you awake, even if that knee is inside your sleeping bag. And it's usually worse than that.
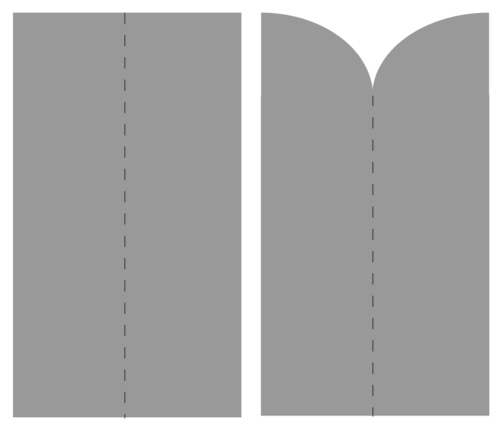
Raw fabric for shell (left). Cut (right ) toward head end to make a sort of boat's bow shape to match the hammock's curve
Try using a 20 inch wide pad and you'll have both shoulders and at least one hip cold. You won't really lose much heat but it will annoy you. The way having a fly trying to crawl up your nose will annoy you, even if the fly is too big to get past your nose hairs.
You will go crazy. In either situation.
So hammock insulation has to be wide enough.
Four feet to four and a half feet long (120 to 140 cm) is fine. For me. But I'm short by today's standards. If you're a big'un you will need more, but you don't need full body length.
And, as noted, hammock insulation needs to be flexible.
And it has to insulate.
And you don't need too much.
So that line of thinking brought me to an underquilt as narrow and short as I can stand, made entirely of fabric. An item that is adjustable and made of synthetic materials. No closed cell foam, no open cell foam, no down, no extra weight.
As above, with insulation on top.
What I have now is a small quilt shaped to fit the hammock with a shell of light fabric and one layer of fuzzy synthetic insulation. The whole thing is held to the bottom of the hammock with elastic cord (shock cord).
At night I stuff my pack inside a large plastic bag tied shut, and keep that inside, under my legs. This keeps my knees bent, relieves pressure on the heels of my feet (which can be annoying), and insulates my legs well enough.
After getting the right size, shape, and insulating qualities figured out, the right suspension was the next problem. For several seasons I did what others do - I tied shock cord to each end of the hammock and suspended the underquilt from this like it was on rails.
But this involves long runs of shock cord and is loose and sloppy. It's like hanging a picture by running a wire from each corner of the room.
I wanted something simpler and more direct.
So now, on each side of the hammock, I have a loop to anchor the shock cord. The shock cord has four free ends, each with its own cord lock. This is how I adjust the tension. The shock cord itself runs through loops along the top edges of the underquilt, supporting it.
I adjust how tightly the underquilt hugs the hammock via the cord locks. This is much easier. There are no long lines to dangle or tangle, and the underquilt can't move around on its own any more. Things are much simpler and tighter this way.
If I need a bit more warmth I can stuff something between the hammock and the underquilt, like one of those two-ounce (60 g) mylar emergency blankets, which I carry as an inside-sleeping-bag vapor barrier (just in case).
Breathability is important.
A foam pad made for the ground is bad not only because it's too narrow and too rigid but because it traps condensed moisture against the body. A breathable underquilt doesn't. With freely breathable insulation underneath you don't have to put up with a damp back all night as well as all day.
Finished underquilt attached to hammock.
How I make one.
First I hang my hammock and put some weight in it. Whatever: a couple sleeping bags, a pillow, clothes, whatever. This fills out the hammock to its normal shape.
Next I decide where the underquilt should go. My current one extends to about a foot (30 cm) from the head end of the hammock. My hammock is short, and I like to lie toward the head end. Someone else will use different positioning. Anyway, once I know where the underquilt's upper end goes the position of the foot end defines itself based on the underquilt's length.
Then I take some thin, light plastic sheeting and pin it to the hammock, trimming it and adjusting until I've captured the shape of the hammock.
Then I go back and measure the hammock from one edge across the bottom and up to the other edge for the full length of the proposed underquilt. I use these measurements to double-check the template I made out of plastic. One should match the other.
After this I lay out the fabric for the shell, trace out the shape, and cut it out, leaving a generous margin to act as a hem.
Repeat the previous step for the insulation. One inch (2.5 cm) thick works well, if it's good quality, but it's easier to use thicker or thinner insulation.
Lay this insulation onto the shell, roll the shell's edges over the insulation, pin in place and sew. Doing this locks the insulation to the shell. I apply some hand sewing as needed.
Just to be clear here, the shell goes under the insulation only. There is no top half going over the top side of the insulation. The bottom of the hammock does this.
I sew down the centerline, through both the insulation and the shell, and then lay an extra piece of insulation in over this stitching so I'm sure to have no cold spot along my spine. This takes only a bit of hand sewing and locks the two layers of insulation together securely.
Sew a fabric tube or some loops across the head and foot end of the underquilt and run shock cord through, then add a cord lock to each end of the shock cord (four total). This will let you cinch down the head and foot ends across the width of the hammock to seal out drafts and finish snugging up the underquilt.
Add loops along the two sides of the underquilt that run along the hammock's sides.
On each side of the hammock, add one loop near the head end and one toward the foot end. These must be past the ends of the underquilt to allow for tensioning.
Anchor shock cord to the hammock and run it through the loops on the underquilt, then adjust tension. Finally, tie knots in the shock cord's ends after adding the cord locks. This keeps them from falling off.