(1) A small, homemade double-wall stove made from empty cat food cans. Invented by Roy L. “TrailDad” Robinson, father of “Flyin” Brian Robinson, first person to hike the Calendar Triple Crown. (Hiking the Appalachian Trail, Continental Divide Trail and Pacific Crest Trail in 12 months.)
(2) Any stove made by cats, or used to cook cats, or to cook food for cats, or used by cats to cook or burn food. (Very few cats are good cooks.)
I never thought I'd do this. Making my own packs, that is. It's pretty dumb.
In a way, you can blame Glen Van Peski, or some other people. The other people are the ones who proved to me that you can actually cook over an alcohol stove and live, even if there are two of you. There were two of them.
I don't remember their names now. One was a local elementary school teacher and the other was from Australia, a guy here on a business contract. They fell in love and backpacked happily ever after. Moved to Australia. After I went on a trip or two with them. Not like being one of the honeymoon party or anything, just one of the group, a random person in a group of random persons who happened to be on the same short backpacking trips.
But I saw what they could do. All the traditional backpacking books, including Colin Fletcher's "The Complete Walker" dismissed alcohol stoves as being environmentally sensitive, compact, light, clean, quiet, and useless, because they took too long to heat anything.
Then I saw one actually being used. And it worked.
So.
There was no point in ever making a pack, or even thinking about it. Packs are complex and fussy, and hard to make. They have a lot of details. Everyone makes them, as in real companies with mass production techniques. Why bother?
So I didn't.
For a while.
Maybe it was the pain that convinced me. It has a way of getting through after a while, and I think it did. That must be it. The pain.
I never really liked the G4 pack. As in really, really, really, really, really liking it. It was designed by a particular person for his own needs, and then sold to others who didn't want to bother making their own. The man who designed the G4 is tall (compared to me). He's big (compared to me). And he does things differently (compared to me).
All fine, except when compared to me. In my world, I count. That's one of the nice things about living in my own little world. I am the emperor and make all the decrees. Everyone else has to run for cover. So when I found myself in pain, the whole empire trembled, and sought a solution. And so I eventually started making my own packs.
Even though it's dumb. Even though it's hard. Even though it's taken just about forever (I'm a slow worker). I've been dinking around for about five years now. Most of my packs worked. A couple didn't. One or two of them I had to throw right into the scrap box before they were even finished. A couple more got used once and never again.
The most famous of these single-use packs (in my world) went on my longest trip ever. It wasn't that long. I know people who have been out for months and have gone thousands of miles. That sounds like fun, but I'll never do it. Not up to it. Couldn't find the money or work out the details even if I was fit enough. But what I have done wasn't too shabby.
I went two weeks and covered 200 miles, in Olympic National Park in western Washington. In its own way it's a tough place. All up and down. Can be tiring. It was. But I learned a lot.
The pack worked fine, and then afterward I cut it up and used the fabric for other things. On about the second day one of the shoulder straps began to pull loose, but a safety pin fixed that. No more trouble. Now I sew better.
The shoulder straps weren't placed right, and cut into the back of my neck, but I know how to design around that now.
The pack wasn't stiff enough, and the way it loaded and compressed the load wasn't the best. I don't try doing things that way any more. It hurt more than it should have, but considering a food load alone of around 21 pounds (9.5 kg) and a total weight (without any water at all) of 33 pounds (15 kg), hey. It should have hurt.
This was a frameless pack. Empty, it weighed about 20 ounces (0.6 kg). Not bad. It worked.
I wouldn't have to be so loony if I'd just cooperate. Be like everyone else. Do things the right way. Be less spooky, disorganized, disagreeable, and ornery. Right. I know that. I know some people too.
I've met and talked to Glen Van Peski, Ron Moak, Brian Frankle, and looked at their goods. Learned a lot about how they make packs. I admire their work. None of them actually sew their own goods any more, but they know how to design, and how to get things done, and have access to materials, at wholesale prices, that ordinary mortals can't even find. I like their packs.
But they aren't for me.
I have a problem.
I use a hammock.
This is not a problem. This is an opportunity. A challenge. A personal characteristic. An idiosyncrasy.
OK, fine, but it gives you a nudge and shoves you over the foul line. If you use a hammock you basically have two choices. One is to buy a stiff pack that is bigger and heavier and more expensive than you need and the other is to buy a not-stiff pack that is more expensive than you need and also wiggly and too light and not durable enough and doesn't carry well.
So I chose what was behind Door Number Three.
Which was a hollow empty space with a note in it, and the note said "Make something up." So I did.
Yeah. I'm dumb. I'm a butthead. It's OK. I'm like that but I want to take control at some point, not just pull whatever off the shelf and repeat and repeat. So instead I've spent years dinking around making my own packs and getting only a little better. Half step forward, etc.
Things are different when you sleep in a hammock. This is a backpacking hammock. There are such things. Kind of a fringe development. I mostly don't mention it until someone else does, and it's funny how often someone I meet on the trail, never seen them before, says they use a hammock. Then we talk for a while but it isn't kinky any more. Sort of like an option that's there if you look for it but most people would not consider even if they'd heard of it.
The "traditional" ultralighter (I guess there is such a thing now) sleeps on the ground. Most people do, obviously. Used to be it was under a tarp of some kind, or in a bivy sack, but single wall tents are catching on too. Anyway, those who sleep on the ground need some kind of pad, for cushioning and for warmth. Ultralight pack makers depend on these to provide a pack with stiffness. Some now use a bit of a framesheet or carbon fiber stays, or maybe a hoop inside the pack to substitute for an internal frame, and the packs are getting out of the ultralight range, but the idea is that a pack, a backpack, needs some stiffness to it.
Sleeping pads come in a 20 inch width (51 cm). If you travel light you limit the length to at most 48 inches (122 cm). It takes almost no brains to fold one of these pads down to a 12 by 20 inch package, and this, in the pack, against your back, provides fair rigidity for light to medium loads. Inflatable mattresses work too. I've used them, and you can adjust the stiffness by controlling how much air they hold.
Alternately, a closed cell sleeping pad can be formed into a hollow tube, inserted into the pack, and then this can be stuffed and cinched to form a rigid cylinder.
No sleeping pad works well in a hammock. They just don't.
They are too narrow, slide around, trap body moisture next to your skin, crumple and lump up, and abrade the inside of the hammock. But mostly they are too narrow, as you'll find out if you ever use one. The big downside of a backpacking hammock is that it can be unforgivingly cold. You need adequate insulation under you, and the only decent way to get this is with an "under-quilt", a layer of soft, flexibly compliant, breathable insulation hung under the hammock and snugged up against its bottom. It doesn't take much at all, but it has to be there.
So my problem is that no pack made is made for hammock camping. A big, heavy pack works, but that's what I want to get away from. A small, light pack works, but not well, and can't carry a real load without stiffening.
How do I solve this?
Part 2.
My problem is that no pack made is made for hammock camping. A big, heavy pack works, but that's what I want to get away from. A standard small, light, frameless pack works, but not well, and can't carry a real load without the stiffening that a frame provides.
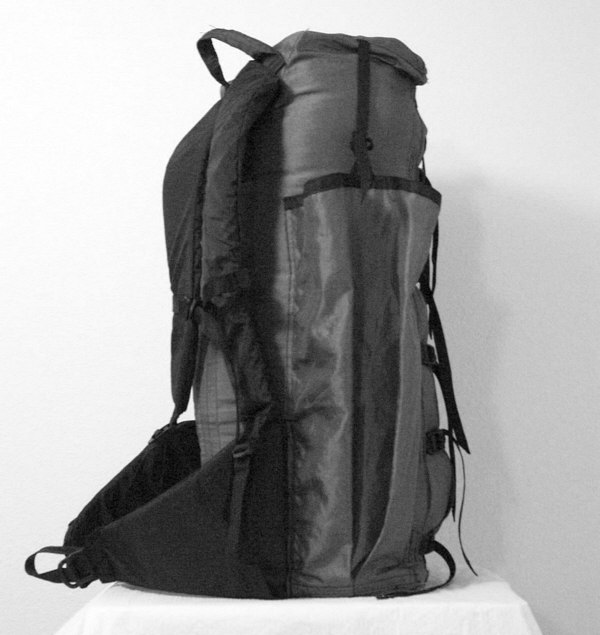
Squeezo pack back.
So how did I solve this? I began making my own packs. My guiding principles are that my pack should be:
Small.
Stealthy.
Light.
Simple.
Convenient.
Comfortable.
Durable.
Adaptable.
Frameless.
Hammock-friendly.
Size. I want a pack that is small. I keep trying to go smaller, but keep making them too big. The right size for me is 25 to 30 L. Also smaller at times, and bigger at other times. Hmmm.
Stealth. Color isn't too important, but I prefer a medium gray because it blends in the best. I once had a gray cat and could find it during the day if I looked, had to hunt for it at twilight, and never saw it after dark. It blended in. Green and brown are good too, as is blue-green (jade, cyan). This last color fades into the haze of those days we have at times. But overall, gray feels best for me.
Weight. Should be low, but isn't hugely critical. I've seen commercial packs at under eight ounces (227 g) but I can handle double or triple that without noticing. (My very first pack weighed 9.8 ounces or 278 g. It wasn't very good but it worked.) My upper limit is unofficially 24 ounces (680 g). Lighter is better. Heavier is not.
Simplicity. The pack has to be simple. I don't either need or want a lot of pouches and pockets and zippers and doodads but what is there should work.
Convenience. With simplicity goes convenience. What is convenient for me is probably not right for you, but I bet you could live with it. Then again, I don't care. This is my fantasy world after all, but convenience is easier to achieve through simplicity, and inconvenient simplicity is pointless.
Squeezo pack front.
Comfort. The pack should fit me well. I've designed packs that could be adjusted for various torsos and that's easy enough, though more bother than I want, so I no longer worry about it. The pack does need two shoulder straps and a hip belt. Some people say that hip belts are optional, or are frills, for sissies, but I suspect that they never go backpacking. A hip belt is mandatory for me. Not a waist belt or a simple strap either, but something padded that can support weight.
Durability. Also important, but not at the level of a commercial pack. I don't have to worry about returns, reputation, or lawsuits. If my pack fails I'm screwed but that isn't a legal issue, it's purely a private one. Anyway, I carry needle, thread, safety pins, extra line, and an extra webbing strap or two, plus duct tape. Mostly I'm OK. Always, in fact. My packs don't have to endure 15 years of idiot abuse. Only a season or two. Some packs I've used only once, ripping the fabric apart and folding it into the next project after I'd learned what I needed to. So.
Adaptable. A big issue for me is adaptability. This brings us back to size, and links to convenience. I need a pack that expands and shrinks as needed. It should accommodate all the food, fuel, water, and extra clothing I need, and should shrink down again as I use things up. The pack should also serve as a day pack, for carrying only a bit of food, some water, and a jacket. Luckily I have a plan.
Once upon a time I bought a Gearskin from Moonbowgear. It is a folded flap of fabric like a taco with shoulder straps and a hip belt on one side. You put your things on the first side, fold up the other side, and cinch it all down tight into a solid wad. My packs are kind of like that but not too much.
I liked the Gearskin idea but the Gearskin is hard to load (the mound of stuff keeps sliding off), and the sides and top are open. And it doesn't compress down small enough to use as a day pack. I came up with a similar idea. My packs are front loaders. The Gearskin has two sets of compression straps, one on each side. My packs have one row down the front (the side away from my back), and aside from that they are closed bags. They don't unfold at all. Formerly I had a top with an expansion collar, but abandoned that. (More simplicity.) Now the pack interior is accessible only through the front.
What I have now is a bag that's shapeless when empty but forms a rigid, light, and comfortable pack when full. There is one huge pocket on each side and that's it. To load it I put my sleeping bag in first, against the back, then lay in the folded hammock, in a U-shape around the perimeter, then add food, clothes, and whatever else. When I'm done I cinch the straps along the pack's front and pull the two sides toward each other. I keep doing that until I can't any more. The compressed pack resembles a thick vertical log with a rectangular cross section, but it's soft on my back. Soft but rigid.
Squeezo pack quarter view.
The things I'll need during the day go into the side pockets. Each pocket is large enough to hold a full Platypus two-liter bladder, plus whatever else I can squeeze in. Sometimes I use a detachable pocket to carry the cook set and the day's food hanging on the front of the pack. I normally carry mass quantities of water only when seeking out a camp site.
The pack is goofy, no doubt.
It has a lot of dangly compression straps on the front, and their loose ends all have to be tucked in. The front is two overlapping flaps that part just enough to let me load and unload the pack. The side pockets are huge, and sloppy looking, but have lifters to keep them tighter than they look (though they always look loose and sloppy).
The pack expands so much (side to side) that I can get a lot in, and it shrinks down to almost nothing after my food, fuel, and water are gone.
This works for me. No one else that I know of makes anything quite like it. As long as I pack it carefully, and cinch it tight, it carries extremely well.
Frameless. The only real problem I've had, other than endangering my life at home every time I'm near the sewing machine, is that, with enough food (even a moderate load like a week's worth), the pack slumps a little, kind of creasing right above the hip belt, and bulges out away from me, a little off to one side. No matter how tight I squeeze it, it wants to do this. The Gearskin does this too. But I didn't want to get into the world of frames. It's probably a matter of less than perfect loading, but I can't fuss too much or I'd never get it loaded at all.
So I'm still working on things.
Right now I'm trying two wooden dowels as stays, one sitting vertically in each of the pack's back corners, just behind my arms. The dowels add only two ounces (57 g), and seem to be worth it. They keep the pack standing straight and tall. My latest pack is made of much heavier fabric than I've used before, and, with the stays, weighs 22 ounces (624 g). This is acceptable. I also found some really stiff foam for the shoulder straps and hip belt. It doesn't permanently deform like the stuff I was using before, so that's good too.
Squeezo pack side view.
Durability is important but isn't a huge issue. I decided several years back that no piece of ultralight equipment should be expected to last more than one or two seasons, especially a pack. I use my gear but take care of it too, and usually overshoot my guidelines. My latest pack is made from such heavy fabric that it ought to last for several seasons, without much weight penalty at all.
Hammock-friendly. This means being able to go without a sleeping pad. My basic problem is that I can't use the standard ultralight tricks. This pack design allows me to fudge.
There are two standard ultralight tricks.
Fold a sleeping pad and lay that into the pack, to fake a frame, or
Roll the sleeping pad into a hollow tube, put that into the pack, and then stuff gear into the center.
Sleeping pads don't work with hammocks. That's what you try at first, but right away you realize you need something better. And then you're left with a pack problem, which is, either to use a frameless pack that hangs on your back like a large, misplaced scrotum, or to use a frame pack and forget ultralightness. So the compression idea works. Not perfectly, since you can't get a perfectly rigid pack, which is why I'm experimenting with two dowels. Better though.
Not at perfection yet but I'm getting close to a final design. I'd want tiedowns on top of and under the pack, to attach overflow bags for food and gear during long trips. For a summer week or less I can fit all my food inside the pack, but for a longer trip it would be hard. My latest pack expands from roughly 25L to 40L. Another 10L or so outside the pack would give more capacity than I could really handle, so I should be good with this size.
I might also make the top and bottom of the pack into flat flaps. Not go back to the top expansion collar idea, but build in a flap that closes tightly. Then I could stow or remove rain wear, a jacket, camera batteries, and so on. Another flap at the pack's bottom would give easy access to wading shoes and other seldom used odds and ends. Straps would keep the two flaps closed and the pack would stay rigid, tight, and taut. Right now it's miserably awkward at best to try to reach into the front of the pack, up, and get to the top (or do the opposite at the bottom).
So, to sum up, here's what I can do with my pack:
Easily carry small, light loads on short trips.
Easily carry medium-sized, medium-heavy loads on long trips.
Carry as much water as I need (I make dry camps).
Have easy access to everything I need during the day.
Travel comfortably, securely, and stably.
Use both hip belt and shoulder straps.
Easily load and unload it.
Scrunch it down to nothing when empty.
Afford it (cost of fabric and thread, plus minor amounts of blood).
Repair it.
Empty, roll, and stuff it under my knees for insulation at night.
Use it either totally frameless or stiffen it with light, cheap, removable stays.
The downside is that it takes me several days to make a new pack, and I haven't drawn up any formal plans, so every time I make a pack I have to re-invent a lot of things like exact dimensions. (OK, I'm not that bright.) Also, even though I'm lousy with a sewing machine my sewing is getting better. Seams don't disintegrate any more. And I haven't needed an ambulance during any recent sewing sessions.
Fabric is relatively cheap. I don't pay for labor, or shipping, or markup, or liability insurance. I can use scraps. I can redesign on the fly. Aside from a few hours wasted, I can make a pack, use it, figure out what's wrong, remake it, and still be ahead.
Some day, when I have plans, I might publish them, or sell kits.
This is true because ticks are creepier than most things. You can find a tick crawling up your leg days after you've been anywhere. And if you find it, it's most likely because you accidentally see the tick, not because you feel anything. That's pretty creepy.
Or maybe you just brush your hand along your neck or scratch a spot on your scalp, and come back with a tick caught under a fingernail. That's pretty creepy too.
Resolved: Ticks are creepy.
You can be extra cautious around lush streams and ponds, but that might not help. Sometimes they lurk even in hot, dry shrubbery, and ticks have several life stages too. During the larval or nymph stages ticks can be so small they're hardly visible, but a tick bite from any disease-carrying individual can still put you down for decades.
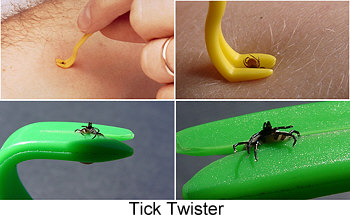
Recently I came across two tools that might help. One is the "Tick Twister" and the other is the "Trix TickLasso". I haven't used either but they both look good.
Normally I've used the blade of a knife, slowly slid sideways from the tick's head toward its tail. Push down hard enough and the fluid pressure in the skin pops the tick out without any chance of killing or dismembering it. I do the killing after it's out.
This can be a little awkward to do alone, like the time I came home and found one at waist level, at the back of my pelvis. Had to sit on the bathroom counter with two mirrors and try this. Ended up digging out a chunk of hide in the process.
Either of these tools look like they'd do a much better job.
Tick Twister
The Tick Twister is a plastic hook shaped a little like a nail puller. In fact, the first prototype was made from a nail bent and cut into this shape. It comes in two sizes, and there is a new model that hangs on a key chain.
You slide it around the tick's head and then twist (after lodging the head into the tool's V notch). That sort of unscrews the tick without damaging it. It works on bare skin or in fur. (In case you have fur, or are close to someone who does.)
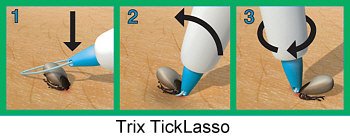
Trix TickLasso
The Trix TickLasso looks a little more complicated. At first I thought maybe this was more solution than the problem needed, but maybe it's better. I say this without even having seen either one of these.
The Trix TickLasso is shaped like a thick pen, but with a lasso at the bottom end. You loop this around any size of tick, tighten gently, and then twirl the tick around until it comes out, the same as with the other tool.
Either one would probably work pretty well, but this second one will handle any tick you find.
The Tick Twister is French and the Trix TickLasso is Swedish. Apparently they've thought about this enough to make special tools for it. A quick check indicates that the U.S. Centers for Disease Control and Prevention still recommends using a tweezers, which is (based on my limited experience) probably the worst way to try this.
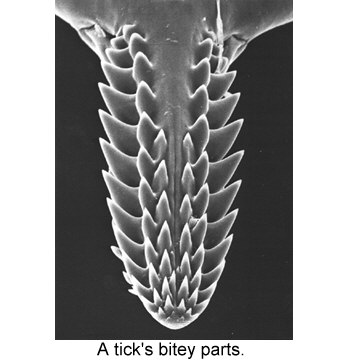
Something else not to do is to try a hot match, a cigarette, hand lotion, petroleum jelly, or other things. I went through all those back in my (short) Scouting days, and they all kill the tick without doing anything else. A dead tick still stuck in your skin can regurgitate back into your bloodstream, and the tick's mouthparts are barbed, which makes it hard to pull straight out, as the CDC recommends.
Twisting seems better.
Luckily, I'm now living in western Washington, and we don't have many ticks here, which is really nice.
Baking oven: On the trail, a pot with a lid (nonstick coating optional) that can be used to simulate baking. The pot should be out of immediate contact with a flame to prevent overheating. This is the kind of thing used by urban pansies in drive-in campgrounds. Backpackers and thru-hikers don’t have the time or patience to play with this sort of toy.
Baking: What you can do at home but not on the trail. No really.
Just back from a five day backpacking trip I have a renewed sense of how hard this sport can be.
I'm not a cross-country walker. The idea is appealing, but I don't have the chops. I'm old enough that I can't just take off half a year, do some stuff, and crash with my parents. They aren't around any more.
Not only that, my body wouldn't stand a multi-month trip, much as I'd like to do one. I've reached the point where I can do what I can do and have to let go of the rest. Then again, this isn't so bad. Everyone is only temporarily able-bodied. At least I can get out every now and then and live close to a lot of interesting country.
But given that, I have a fair amount of experience. I've paid attention, practiced, and thought things through. I know the drill, so when I do make a trip I can do it pretty efficiently and safely. If I pay attention.
That helps, but it doesn't cover all the bases. Walking with a full pack is still hard work. Walking with a full pack piled extra full of water in the hot sun, going up one side of a mountain and down the other while being eaten by flies is much harder.
I just got back from tramping across the north side of the Mt. St. Helens National Volcanic Monument.
About a month ago I hiked around the mountain, and don't recommend that until two intense seasons of trail maintenance go by. It's just too torn up.
But north of the mountain things are better.
There is an area called the "Mt. Margaret Backcountry", which got the full force of the blast in 1980 but differs from the land closer to the cinder cone in that it is not flat. It's a series of ridges, peaks, and deep holes. Still, though, everything that was there at the time was blown away or incinerated.
Now, 29 years later, trees are returning. There are shrubs, flowers, grasses, and many small blue lakes quietly nestle in the deep holes among the peaks. And even farther north there is old growth forest (thick, tall, impressive western red cedar, douglas fir, hemlock and other species) and flat, smooth trails.
I wanted to hike across the Mt. Margaret Backcountry, skipping the required camping permit by traversing the whole thing in one day, and then hit the northernmost part of the Monument for a couple of days, and then backtrack out.
It seemed feasible. The first and last days would be about 17 miles. The map showed some up and down but it didn't look too bad. At least there were no deep, crumbling, dangerous collapsing canyons roiling with boulders and clouds of dust as there are all along the Loowit Trail, which circles the mountain. I had enough of those a month ago.
This is where some principles of backpacking in general, and lightweight backpacking come together to make things:
Possible
Safe
Enjoyable
First, and probably most important, is the reality check. You need to have enough experience behind you (especially if you're going solo) to know what your limits are, what the weather can do, and how to prepare.
You also need to keep current.
The first backpacking trip of the year tends to be a shakedown cruise. You take too much, or not enough. You forget that you really need to be in really good shape. Sometimes you think you can go farther than you really can. Things like that.
A trip or two (even a handful of day hikes) brings you back to reality, keeps you from going nuts and getting hurt. They also get you back into practice. A person needs to stay on top of the game. Given a decade or two of experience the first one or two trips every year bring back enough memories to pull up the focus. This is good.
Ideally, for the sake of sanity, you'd go out and do a trip, wait two weeks, and repeat the same trip. You would be sure to get everything right the second time around. But who would do that?
So you try to remember what you already learned the hard way, and prime yourself afresh with the year's first trip.
Or so you hope.
I kind of blew it. Not terribly, but I wasn't tuned in yet. The trip was too ambitious and the route was harder than I thought. I put on a lot of miles in five days but went only three fourths as far as I'd planned.
But here's where the other stuff comes in. I didn't get hurt, go hungry, get cold, get heat stroke, or get lost. The trip I did wasn't the one I planned but after some mid-course mental adjustments it turned into a shorter trip that was just hard enough and just long enough.
This is where ultralight principles kicked in. They saved my butt.
There wasn't much to do about the weather, the water supply, or the terrain. The weather was warm and sunny but not hot. The terrain was rugged, either going up or down (some of the trail seemed intentionally designed to be infuriating). Most important, water was nonexistent in some areas.
I couldn't control these, but could control the rest.
The first day I began hiking at 8 a.m. and didn't get to bed until 10 p.m., partly because I had to carry a full day's load of water. This was about six quarts or 12 pounds (6 l at 5.5 kg). Ascending a couple thousand feet (610 m) in the sun with that water weight added onto a five-day supply of food and all your gear makes it a completely different kind of party.
Although the air was cool, there were long stretches in full sun and dead air, which made it seem 20 degrees hotter.
Fine. Enough whining. Here's the rest of the story.
By practicing light hiking you can prune the stress level back and do more with less, which is what I had to do. The categories are:
Simplicity
Thoughtfulness
Efficiency
Simplicity
Simplicity means taking only what's needed, and only enough of it to get the job done. Take the smallest, simplest, lightest items that can possibly do the job.
For example, I carry an LED light instead of a traditional flashlight with incandescent bulb. In fact I take two. They're only a quarter ounce (7 g) each, so the redundancy doesn't hurt. Since there is no substitute for light, taking two adds a nice safety margin. In a pinch I can use a piece of duct tape instead of medical adhesive tape (or vice versa), but can't replace light with anything else.
With everything else, though, I either take the lightest, simplest thing I can find, or leave it out altogether.
Thoughtfulness
Thoughtfulness is the key.
Thoughtfulness is based partly on smarts and partly on experience. To get really simple and really light takes thought. And good ideas are just that. Most good ideas fail on the first try, since they're really bad ideas, so experience is necessary as a filter. Once you get a handle on what works, what doesn't, and what's best your your very own self, you can break your gear and processes into categories and continue to think through them.
I have ten categories:
Shelter. No need for a tent, most of the time. Drop it and save two to four pounds (1 - 2 kg). Small tarps are the lightest way to go, but I can't sleep on the ground any more. My hammock is heavier than a tarp but intensely comfy and still lighter than a tent.
Bedding. A down bag works, preferably one that is too light. Wear all your clothing to bed and also stay out of the wind. A two-ounce (60 g) Mylar emergency blanket, folded and kept against the chest adds a lot of warmth without weight. Or use it as a bag liner.
Pack. Some are barely there. I make my own and although they aren't the lightest available, mine are less than half the weight of mainstream packs, and do exactly and only what I need. My packs are also getting smaller as the seasons go by as my philosophy moves toward using external stuff sacks for temporary overflow rather than having a big pack.
Food. Keep it as dry as possible, with as much fat as possible. I'm experimenting with two cold meals a day, for speed and simplicity though this might not be the lightest way to go. We'll see.
Water. For mass loads of water I use the 2.5 l Platypus bladders, which fold flat and weigh nothing when empty. Mostly I use an Aquamira filter + bottle for on-the-go drinking.
Cookset. My rig weighs around six ounces (170 g): stove, on-ground reflector, pot stand, wind screen, pot, lid, lighter and matches. It's about the size of my two fists put together. Tiny and light.
Clothing. Never take more than you can wear at once but always have dry clothes to sleep in, or come as close as you can. Overnight, clothes fill in as half of my insulation.
Protection: Rainwear and a wind shell. My full-coverage wind shell weighs six ounces (170 g). I wear it to bed, in the morning and evening, and during stops (if cool enough, to keep off bugs). If the weather is guaranteed dry I'll leave rainwear at home, or escalate by taking any of several outfits depending on what might come along.
Sundries. These are things like rubber bands, safety pins, a tiny blade, some bandages, emergency water treatment backup, extra line, needle and thread, and so on. Also a bottle of liquid soap, a square of fleece to wash with, maps, nail clippers. All things you can do without unless you need them or don't want to be dangerously filthy. Rubber bands, safety pins, and duct tape can be real life savers.
Footwear. I haven't worn boots for nine years, and shudder to think of going back to them. Trail running shoes work for everything I've come up against, and save huge amounts of walking energy while being much easier on the feet.
Efficiency
Efficiency kicks in when I've got all the above sorted out and remember how to do everything right. I try to focus on speed without sacrificing fun.
Going light means that on the trail you can go fast. Climbing is easier, descending is not so hard on the knees and ankles, and on level ground you can really howl with a light pack.
Efficiency means quick and organized setup at a campsite in the evening, and quick packing in the morning. With my hammock I simply pull a sleeve over the whole thing (hammockers call this a "snake skin") and the fly, the hammock, the under-quilt, and the supporting lines are all converted to one long sausage for easy stuffing into a pack.
Eating a cold breakfast and supper (pre-baked at home) means no need for cooking or any cleanup at all for those two meals, and less fuel carried.
Washing is efficient because I carry a bottle with a water filter in it. Pull out the filter and the bottle becomes a handy scoop for pouring water over myself. A small square of fleece fills in for sponge baths on cold days or when there's no opportunity to disrobe and splash.
So what's my conclusion? I did screw up on the last trip.
My plan was too ambitious and I wasn't fully prepared. I had to carry huge loads of water uphill for miles. This was hot, tedious, and slow.
The up side was that if this had been the old days when I thought a 40 pound (18 kg) pack was light, I wouldn't have made it past the first day.
By honing my technique and doing some thinking over the past several years I haven't achieved any miracles. While I'm getting tuned in and smarter I'm also getting older and weaker, but the advantages of traveling light, simply, and efficiently mean that I can still do better than at least 90% of backpackers out there, with less, and still have fun.
Fire making is a complex process, as you know if you've ever tried to start one.
Harry Houdini said "That fire could be produced through friction finally came into the knowledge of man, but the early methods entailed much labor." No kidding.
This man had been around. If anyone knew, he did. If you don't think so then try rubbing things together and see what happens. Not much.
You will get bored, and tired, and blistered. To break the tedium try rubbing a balloon and sticking it onto the cat. You'll get excitement, heat without light, and some scratches. But no fire.
When you finally get fire it's because you did everything right. You need the atoms of one thing (fuel) excited enough to go and fight with atoms of another thing (oxygen). They get all mixed up, give each other lots of black eyes, and produce lots of heat and light. You want this. This is fire.
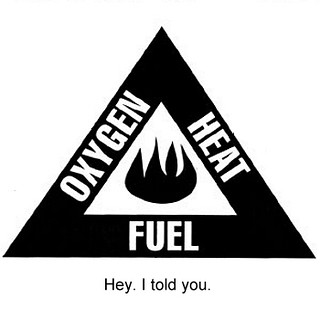
You need three things for fire: oxygen, fuel, and heat. This is true. Ask any firefighter. They know.
Luckily for us the atmosphere is 21% oxygen, and available worldwide, but things weren't always this convenient.
It took billion of years for disturbingly odd nameless blobs mucking around blindly to come up with the idea of oxygen at all. Then more millions and millions of years until they produced enough of it to matter, and it turned out to be toxic, killing most of them, but they kept at it, all so you could cook lunch.
So next time you see a wad of pulsing slime working away, churning out oxygen, how about a kind word? Maybe a kind word and a handful of granola? You can spare it.
OK, item two: fuel.
Fuel is what burns. Look around and you'll see plenty of it. For example, if you've ever set your pants on fire you've discovered fuel. Fuel is often the limiting resource in the fire equation, especially if you're wearing shorts.
Finally, the magical third ingredient, the hot stuff, heat. It starts things going and keeps them going.
So you have a fire, but the ideal, if you want a good, hot cup of coffee, is a controlled but self-sustaining fire. For this you need to be good at math, but not all that good. No adding or long division needed, just balancing this simple, three-element equation: heat plus oxygen plus fuel equals fire.
Or, if your higher faculties are more limited than that (possibly due to hunger, or because you're a backpacker) just remember that when you see wood and air and a flame you get a yummy cooked treat. Arf! Arf! Arf! Arf!
The theory of fire (there is such a thing), calls this "ignition continuity".
Here's how it works. Heat from the fire (the bright, wiggly, hot part that burns your paws) cycles back into the fuel and oxygen mix and keeps them hot enough to continue doing that thing that they do. Adults may know this as an "uninhibited chain reaction", but a full description is not available here.
Another interesting fact: solid fuel does not burn, and neither does liquid fuel. Only the whiffy, stinky, smelly stuff does. The whiffy, stinky, smelly stuff may be visible (smoke, from vaporized wood) or invisible (vaporized white gas, naptha, alcohol, benzin, kerosene, butane, or whatever you call it where you live).
Now, time for a quick review.
If you want a hot lunch you need oxygen, and fuel, and some kind of energy to kickstart things. Then when burning begins it throws off more heat, which keeps the process going. And this process continues until something runs out. Run out of fuel, or oxygen, or heat, and you're done. You need all three. So it pays to be quick with the weenies or you'll have to eat them cold.
Now you know why you can put out a fire by throwing water or sand on it (cuts off oxygen and cools it) or by pulling sticks out (removes the fuel). Or by taking off your pants (if you made a terrible mistake).
Of course there is more to it than this, and if you promise to be very, very good we may continue our story later some time.
See tabs at the top for definitions and books.
Have extra info to add?
If the commenting system is out again, then email sosayseff@nullabigmail.com
Me? Recently nominated for this year's Doofus Awards. (Next year's too.)
An alcoholic beverage made from barley, water, yeast and hops. Most hikers crave it, but since there is no dehydrated form, few hikers carry it. Beer cannot be burned in backpacking stoves and must be metabolized by the body. Though useless for cooking, it often causes joy. Beer can lead to mental and physiological changes that range from pleasant and fuzzy emotions to complete and even catastrophic muscle relaxation. Should be taken orally.
2 - A bag that a hiker carries food in. The bear bag is suspended from a tree branch at night in order to keep bears from getting into it.
Some high-tech bear bags are made from space age Kevlar fabric to make it harder for bears to rip open (if a bear does find the bag). Some have reported that this can result in an intact, saliva-covered and well-chewed bag containing food crumbs.
The usual bear bag consists of a bag (clever choice there!) and rope or cord long enough to hang food and supplies out of the reach of bears, usually from a tree branch. The bear bag and rope are used while in bear country, and wherever other annoying animals could get to the food.
Mice, skunks, raccoons, woodrats, chipmunks and anything else with teeth and an appetite are honorary bears. Items that must be protected include toothpaste, soap, deodorant, sunscreen and anything else with a scent. Some claim that anything carrying a human smell qualifies, including clean, scentless odor proof plastic bags.
Savvy critters frequently exposed to campers are known to have learned that anything associated with humans may contain munchies, and some of them are rumored to be attracted to the smell of new, clean, ostensibly scentless plastic bags.
3 - Property of a bear: what your food bag becomes after the bear gets it. If this happens, then give up already.
Ultralight backpacking is supposed to cut through this but I don't see it, only more cruft.
Cruft is what got me into the ultralight end, and one of the things that got me into backpacking. So many cute little toys to dink with. I'm trying to learn my way out of it.
I know someone who gets tingly near any REI store, and I can understand that. That is, I remember when I could understand that.
Outdoor shops are stuffed with cruft. They sell it. The more they have the more likely you are to come and look. All the pretty, shiny things. The more you look the longer you stay, and the more you buy.
This has nothing to do with hiking or backpacking or bicycling or kayaking or skiing. At all.
It's marketing. They make money when there is a transaction. You decide that what they have is worth more than your money, and they decide that the money in your pocket is more valuable than what they are selling.
Think about that for a while. It doesn't really work unless you lose.
But that's another story.
Right now I'm thinking of feet and what I have to do with mine. I'll have more to say later sometime. It will take a while. Some experiments have to be run. Data digested. Calipers calipered. Hanenframies hanned and frammed, then fine tuned. The usual.
Tweakage must take place.
My thoughts today are with streams and water and rocks, and how to cross streams full of sharp rocks and cold water. And what to do, midnightish, when watering the flowers.
One thing is clear. I'm happier, freer, and more comfortable since I quit wearing boots. Trail running shoes have brought a lot of freedom, but I still want a supplement. Something to wade streams with. Something to slip into briefly around camp for short trips on dewy nights.
Shoes are much friendlier than boots, given. Even after a huge hiking day I no longer need alternate footwear to recover in. But it's nice to have something for those other times.
There are several options, but I want to mention something odd and new. It's footwear put out by Vibram (the people who invented gnarly rubber boot soles in 1935). They call it FiveFingers.
Shoes like armored toe socks.
They're light enough. All models in size 42 (U.S. 8 1/2) are well under a pound (454 g) per pair. But that isn't the key.
They have toes. Each shoe has five little bays, one for each toe. They are meant to be worn without socks. The uppers are stretchy and flexible. The soles are a thin variety of Vibram (smooth, not lugged). They are recommended for pretty much all moderate outdoor activities including running and climbing. Cost is currently $75 to $85, depending on model.
I'd bet that these are great for feeling the way across a tricky stream bed. No need to worry about stony points, sharp sticks, or abrasiive edges. Or nails, or broken glass. They come in a variety of colors. They look like fun.
I won't buy them. Too big, too expensive, too heavy. For me. More cruft, by my definition. I could eat for two weeks on $85. So I'm still looking for something I can buy or make that weighs almost nothing, costs almost nothing, can be bought or made easily, anywhere, and discarded without regret, and works. And packs down to nothing. Still thinking on that.
So I'm still hooked on my own kind of cruft then. How about that? Didn't realize it until just now.
Anyway, FiveFingers probably work really well. Your choice. Nice to have choices.
No need to stuff a bunch of words in here, except to make a couple of notes.
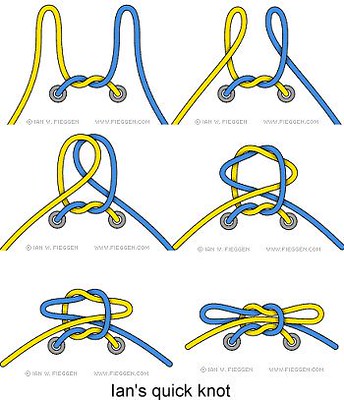
Such as, if you are looking for a one-handed knot, look here.
Such as, if you are looking for quick-to-tie knots, look here.
Such as, if you are looking for secure knots, look here.
Such as, if you are looking for decorative knots and lacing patterns, look here.
Massively illustrated. Masterfully illustrated.
Learn how to teach your kids, or someone else's.
Wallow in the FAQ.
Find shoelace accessories.
Learn the truth, the whole truth, the history, the entire meaning of aglets, and how they affect absolutely everything else on earth, all of it, everywhere.
Read shoelace news you never expected: "A 6-year-old student at an elementary school in Tennessee fell on a pencil when she tripped over her shoe lace and put a hole in her trachea...School officials said the girl was carrying the pencil when one of her laces became untied." (Yeeg!)
Find shoelace books. "Tie A Bow, Ben Bunny", by Mavis Smith looks good. I'd buy it. I happen to like bunnies as well as, if not more than, shoelaces.
"The Neddiad", by Daniel Pinkwater, about shoelace heiress Neddie Wentworthstein, who "Took the train, went to Hollywood, and saved civilization". Yow! Can't beat that!
Site has: Ian's illustrations. Info on lacing shoes, tying shoelaces, dealing with slipping or crooked shoelaces, managing shoelace length. News about the shoelace market. Links. And on. And on. Take control of your life through proper shoelace management.
Handy to have in case of stove accidents. Provides insulation and fireproofing. More useful with older, white gas stoves that are more likely to explode. Also nice for those in the habit of spilling fuel on themselves. A frequent need for one of these is a good indicator that maybe you should find another hobby.
It's used everywhere. For art studios. Jokes. Blog names. Clothing companies. Planetary defense strategies.
What is a spork? It's like a spoon with teeth. All the better to hurt yourself with. There is a spoon-like bowl, and on its tip there are tines to poke food. Like all hybrid devices, the spork has a hard time justifying its existence. Because it doesn't work very well for doing much of anything.
Except for
being a joke, or
inspiring conversations, or
starring in jokes.
But that isn't because of anything the implement does. It's because of the name. In other words, it's all marketing.
Who says poetry isn't important? It is. There is poetry in the name. Spork is a one-syllable poem with more punch and 15 times fewer syllables than any haiku, yet it invokes an infinite regression of images with that single sound.
I had an English teacher in high school. Whatever the female version of dolt is, she was. Call her Asinina. Tried to convince us one day, while explaining onomatopoeia, that "bush" was an example. If it was, then spork would be better. Round, gentle, and spoonlike yet tangy and with points, not to be ignored, fork-like. Spork.
In my world spork is a fine word. Much better than the phrase "cutting spoon", which a 1908 precursor was called. Even better than "foon", though not by much. Spork describes intent while foon is better at illustrating results.
Spoon-fork versus fork-spoon.
People carry sporks to go backpacking. I've never understood why.
But then I've never understood why people take bottles of wine either. Or steaks. Or eggs. Or even those $10 freeze-dried plastic-flavored meal kits.
A spoon always worked for me.
Until one trip, when I forgot it.
Then I used a stick.
Like eating soup with a knife, if I'd had soup, but I didn't, so it was fine.
Now I don't carry anything, not even my 1/10th ounce (3 g) MRE superlong spoon, which is the bestest spoon there is for digging food out of a bag.
But now I suck food from the bag I "cook" it in. Much better, and it took only 25 years to figure this out. First I boiled food in a pot, ate from a plate, and washed up. Then hot-water hydrated in a ziplock bag, digging in with a spoon and getting the spoon and my fingers dirty. Then, after years of this, realizing that I could tear a corner off the bag and squeeze the stuff out.
No cleanup at all, hence my current sporkless, spoonless, simpler life.
Did you know that fork (forca) was originally a "forked instrument used by torturers"? We'll continue this later.
"Then, by elevating the spork into the sky (this spork would have to be really big, so it could be seen from outer space), standing it on its handle, it would be a floating billboard demonstrating our technological achievements. The aliens would then look at it and say, 'Hey! They've got a really big spork!!', and would withdraw the attack."
It's dark — early morning in winter. Out here, in the Pacific Northwest, things are different.
I'm from snow country, and there, in winter, it never really gets dark. When there is snow the ground is white. And winter is a time of clouds. Light bounces forever between white earth and white sky, no matter what late hour the clock displays. It never really gets dark there.
Not here.
In the Pacific Northwest winter is a different beast. A wet one. A dark one. Winter brings rain and not snow to the lowlands. With rain comes wet. When things are wet (the earth, the trees, every building, each dead fern and fallen leaf), they go dark. Any light escaping upward to the clouds is bounced back and thrown into the black earth where it dies.
Here winters are darker than dark. Everything swallows light. You never really know what is happening around you.
So that's my situation now. I'm walking to work along an old railroad bed that no one else uses. I start work early, so during winter I'm part of the darkness as I go in to work. And as I come home again.
But I have something. A new toy. A light. A small one. It is yellow. I want to try it. To see how good it is.
So I point it down the trail, into the blackness ahead, and push the button.
I am nearly blinded.
Damn. This is one good light.
It is a Pelican L1. I like it.
A few years back, when they were new and still rare, I took a shine to LED lights. Everyone is getting familiar with them now. They are more common and cheaper than ever. Still, these lights are light. They are tough, and they can be tiny. That's what attracted me.
Rather than generating a lot of heat and a little light, as incandescent lamps do, LEDs make light in a more natural, less 19th century way. Instead of heating up a piece of wire to the screaming point as they pass through it, electrons in LEDs express illumination by jumping up and down among energy levels. This comes more naturally to them. Because of this light comes more easily, and thus more efficiently, so you can have one of two things.
More light for the same energy or the same light for less energy. Either way, we benefit. Happier electrons, happier hikers. Good all around.
So Pelican.
A well known company. A U.S. company. With a guarantee: "You break it, we replace it...forever. (This guarantee does not cover shark bite, bear attack or damage caused by children under five.)" They make cases. For memory cards, for laptops, for tools, for whatever. Good cases. Hard cases. Indestructible cases. The kind you can depend on.
And lights. Eighty-two different lights. Some incandescent, some LED, but all built like their cases. Well.
The Pelican L1 is tiny. It is 2.6 inches (7 cm) long. With batteries it weighs 0.9 ounces (30 g). That's small. Light. You can hold one in the palm of your hand and have room for an orange. You can have the light in a black body if you insist, but I like yellow. No use testing fate on a dark night. Even out here, in winter, in the dark, I can find it on the ground. The yellow one.
This light is also over driven a bit.
They say that LEDs last 100,000 hours. Some say half that. Even so, 50,000 hours would be 25 years of work time, eight hours a day, five days a week, 50 weeks a year. Either number is enough. But push too much voltage (or current) through an LED and you break it. Like a fuse melting when all the appliances go on. Push just a little too much (not enough to cook it) and you get an extra bright light.
LEDs are getting better. Some are really bright these days, but still expensive. So the cheap way to extra light is to shove in extra voltage. That's what happens with the Pelican L1. It uses four LR44 batteries, little button cells, instead of the three it ought to have. Maybe the LED won't last quite as long, but it works. With a vengeance.
Look into the business end of this light, then switch it on, and you won't see much for a while. Just an afterimage. It's almost too bright to use around camp. You have to be careful. Using it ruins your night vision for a while.
The light's body is polycarbonate plastic. The switch is a rubber-covered button on the back end, and there is a plastic clip for attaching the light to a shirt pocket. Luckily, the light also has a lanyard hole in that clip, so you can hang the light around your neck. Too easy to lose otherwise.
The switch has two modes: temporary on, or full on/full off. You can use the light to blink a signal, or hold it in your hand and flick it on momentarily every few seconds as you walk. Having the switch on the butt end is awkward at times, and it is possible to pack the light away so the switch is depressed enough to turn on the light. Not great, but a bit of care helps, as with most things.
And as with most things the batteries are getting expensive, but if you buy a dozen or so at a time you can tone down the cost. Get them the wrong place and you'll spend $3 or more apiece. Be smart and you can come in under a buck. Your call, but you have to think ahead.
Besides using four LR44s, you can try two CR 1/3N lithium batteries. Much more expensive, but again there is the bulk purchase option. Maybe $10 each at a Radio Shack, or under $4 if you buy six at a time by mail.
Also, true waterproofing isn't part of the deal, though this light is water repellent. Normally you'll need a light only in camp anyway, when conditions are less demanding. But I've hiked along the coast before daylight, among wet rocks, surf, and seaweed, holding this light in my lips, protected by my hat, and it works. (I haven't graduated to headlamps, in case you haven't guessed.)
Is this my only light? No.
Is this my favorite light? No. Normally I use a Photon button light, and carry two. But this little gem is fantastic when I need lots of light, in a small package.
That's pretty good. And it's a nice, clean yellow too.
A person who hikes, stays overnight along a trail, and carries all needed equipment and supplies.
Irresponsible, antisocial, smelly and pigheaded individual who follows his own rules while grinning madly and/or talking loudly to himself. (Yes, they tend to be male.) Quote: "He came to town with one shirt and $20 and didn't change either one."
(1) The U.S. Forest Service defines underburn as "a burn by a surface fire that can consume ground vegetation and 'ladder' fuels." Since those folks get paid for what they do, this definition probably means something.
(2) Let's try that again.
Underburn: A fire limited to 'surface fuel' which therefore has a low to moderate intensity. Underburns are often prescribed for dry forest types such as ponderosa pine or mixed conifers to reduce fuel but leave the trees intact. These are usually classified as low-severity fires. When the professionals in charge actually know what they are doing.
(3) Partially-cooked food.
(4) The sensation you get from the very bottom part of your body the day after you've eaten something really really spicy, and it has suddenly decided to leave you in order to set out on its own. Suddenly. Emphasis on suddenly here.
Have anything worth adding? Then try sosayseff+eff@nullabigmail.com
Me? Still running.
Etc...
so says eff: sporadic spurts of grade eff distraction definitions: outdoor terms fiyh: dave's little guide to ultralight backpacking stoves boyb: dave's little guide to backpacks snorpy bits: nibbling away at your sanity last seen receding: missives from a certain mobile homer noseyjoe: purposefully poking my proboscis into technicals
Traditionally backpackers carried iodine tablets to treat back country water. Some used ordinary chlorine bleach, even though it's less effective. Some claim they never treat their water, but during the last couple of decades expensive and heavy water filters have become the standard solution. These days hardly anyone blinks an eye at spending a hundred dollars or more for a water filter, or bothers to think about carrying an extra pound or two of dead weight.
Instead of having a pocketable green glass bottle containing a few brown iodine pills, which take a while to render water reasonably safe, backpackers these days normally tote a gizmo the size of an espresso maker, complete with hoses and pump. Waiting 15 or 20 minutes is too long. People would rather squat by a stream, hook up the filter, and work up a sweat horsing a reluctant trickle into bottle after bottle, saving no time, and carry several pounds of water as they resume hiking.
Go figure.
There are several side effects to carrying a filter. One is weight, of course. Another is bulk. Expense. We already mentioned that one too. Complexity. Check. One thing people seldom talk about though is risk. It's easy to screw up while using a filter.
A filter relies on two things. One is the filter's designed ability to remove critters, gunk, and yucky chemicals. The other is cleanliness. User responsibility there. You have to keep the filter clean, folks.
Obviously, but few people think enough about this. After all, a water filter for backpacking use is helpful, healthful, and is cleanliness itself. It seems to generate spotlessness just by being there. Only it ain't so.
A filter is a tool. A machine, and is simply ordinary matter inhabiting a particular form. There is nothing magical about a water filter. It is not perennially pure. It does not create goodness. It can become contaminated, and can then pass that contamination on to you. Tricky.
Every filter has a dirty end and a clean end. I have very little experience with filters, but I have tried a couple of gravity-powered ones that I rigged up, and even based on my vanishingly small range of experience I feel absolutely confident in saying that it's hard, hard, hard to keep the dirty end and the clean end apart. Every day. All day. Without fail.
I can't imagine a perfect way to do this, but I can remember the times I've seen people filter water, then wind everything back into a nice tight package and stuff the whole shebang back into the pack. Wet. Where the contaminated end of the apparatus can work its magic on the clean end. Out of sight, out of mind. Until the diarrhea hits.
And I've seen someone use a communal filter, first pumping water then dragging the outlet hose through dirt, ashes, and finally horse manure before hanging it from a tree where it would stay safe and clean (too late!) for the rest of the party to use later.
Personally, I've settled on a small water bottle with a built in filter, with chlorine dioxide to back it up. I can stop, scoop up water, and drink it immediately, use the bottle with filter removed as a bath bucket, or carry raw water in the bottle, with the filter in place, for later sipping. The chemical treatment is handy to treat a bunch of water overnight, or simply as a backup.
That's all pretty good.
But something interesting came along recently. A way to treat water without a filter, and without chemicals. Practically speaking, without anything.
Let's first take one step back and praise Ray Jardine.
If he didn't invent light backpacking, then he at least reminded the world that it was possible. I'm easy with saying that he reinvented it. In some circles these days he's denigrated for various reasons, one of which seems to be that though he either invented a lot of techniques, or at least popularized and promoted them to a skeptical world, in some ways his techniques seem stuck in the middle 1980s. Be that as it may (or may not) be, one of his ideas in the water world is really cool.
And that is carrying plastic soft drink bottles instead of huge aluminum canteens or those thick, bulky, ponderous Nalgene bottles that seem to be required kit for backpackers. Sure, I'm dated myself. Things have changed again. Nalgene is now out. Today, if you want to be a cool backpacker, you have to carry the equally expensive, bulky, and heavy Lexan bottles. But you now have designer colors. Aerodynamic shapes. Coming soon: tail fins.
Tail fins, I miss. Not that I ever liked them, but they were big once, during a time I remember well. And you could be sure that if you saw tail fins, a car was attached. In the tail fin era cars were ugly, a situation that the fins did not tend to ameliorate. At all. Not even a little. But in those days cars were big, had shiny bumpers the size of sofas, and were slow to maneuver. And easier to avoid. Life was simpler. But their day has passed, as has the era of Nalgene bottles, and as the era of Lexan bottles will too.
For bulk water, I avoid the above by using Platypus bladders. Get one as big as you can stand to think about and empty it, it folds flat, and never weighs more than an ounce or two. Jardine's idea was similar though slightly bulkier. He simply used garbage.
Buy a liter of any fizzy soft drink, and you get a free bottle. It doesn't fold flat when it's empty but it weighs next to nothing, and the price is always right. You can even scrounge them if you prefer not to pay. I've tried carrying them too, and they work, though I prefer another solution, as noted above.
Still.
Jardine applied some original thinking and reached an elegant solution. So did Aftim Acra, a professor at the American University of Beirut, in Lebanon, who began experimenting in 1979 with three elements: clear bottles, water, and sunlight. As odd as it sounds he and his co-researchers developed the simplest and cheapest form of water purification possible. Using the same kind of bottle that Ray Jardine came to favor.
Here's what you need to do.
Put water into clear plastic bottles. Lay the bottles in the sunshine for six hours. Drink.
Bright sunshine, ultraviolet radiation, and heat do the work. The water should be clear (not turbid), and it needs to get enough sunlight, but the process works even on days that are half cloudy. If the sky is overcast the process works, but needs two days to complete. This is called "SODIS", solar disinfection. It uses plastic bottles, the same sort that Jardine has been touting. The material they are made from is PET, polyethylene terephthalate. It is light, tough, available everywhere (these days, as ready made bottles), and mostly transparent to ultraviolet light.
Professor Acra's results were first widely published in a booklet put out by UNICEF in 1984, but I bet you haven't heard of them before, or him. Since 1991 The Swiss Federal Institute of Aquatic Science and Technology has been testing this process, which is easy for almost everyone to use, though it's practical only on small scales (so far).
Sounds too good to be true? Here's what SODIS has been proven to kill:
Yeast and Mold: Aspergillus niger, Aspergillus flavus, Candida, Geotrichum
Protozoa: Giardia, Cryptosporidium
As long as the water is clear, the bottles aren't damaged or opaqued by scratches, the sun shines, and the water inside the bottles can warm up a moderate amount, the process works. PET plastic leaches almost no stray chemicals or heavy metals into the water, and the process imparts no strange tastes or smells.
Well, sounds perfect if you have six hours every day to sit around and let your water purify. True, this is not going to be used on many backpacking trips, but it is an option, another trick to keep in your pack for those times when you just might need another option. I'm guessing that a Platypus bladder might work even better than a round soft drink bottle, which does not have an ideal shape, so a stray lightweight backpacker laid up for a few days might find this viable.
One that requires no mechanical skills or pumping. A self-sterilizing miracle.
A thread in science fiction for decades has been creatures or whole ecosystems based on silicon standing in for carbon. In our world carbon is handy, and not only because it makes good charcoal briquettes (which are just about 100% carbon). No.
Carbon is handy because it makes life possible. Life as we know it. Life that is good to eat. Life that is good with gravy.
Not surprisingly, carbon has some peculiar characteristics.
Such as the ability to bond to itself, and the ability to form long chains, which makes polyester underwear possible, and plastic bags. Carbon is handy. Octane is an eight-carbon chain -- along with some hydrogen flavoring -- that makes internal combustion engines run happily.
Sure, we now have some problems with carbon floating around in the atmosphere and mucking up the climate, but as your mother should have taught you, there can always be too much of a good thing. Someone wasn't listening.
But that's beside the point. Carbon is really nifty. It combines not only with itself in all sorts of interesting ways, but it combines with all sorts of other things in equally clever configurations. Carbon is all over, doing all kinds of things, both inside your body and everywhere else too.
But carbon has a few problems in some applications.
Make rubber out of it (or let a tree do it for you) and you get something that is flexible, waterproof, stretchy, bouncy, and pretty much impervious to decay. For a while. Eventually it breaks down, crumbles, gets gooey, and rots.
And heat is hard on it too.
But silicon is related to carbon. In a close way. Silicon is like an older sibling. It sits right below carbon in the periodic table of the elements. The periodic part is important. This table is set up to put similar things together. So if one element shows up on a different row but in the same column, that's because the two are related.
Elements lower down in the table are more massive. They have more neutrons and protons in the center, and more electrons whizzing around, but it's the way the outer electrons are arranged and not the number of them that accounts for chemical properties. The family resemblance.
Silicon and carbon are chemically pretty similar. But silicon is a little less nimble, and slower to get involved in new relationships than carbon, so it's probably not the basis of life anywhere in the universe (but we're open to pleasant surprises). So all those science fiction stories about silicon based life forms are still good stories, but not predictors of what anyone will ever find. Maybe.
But.
Silicon can still be made into some products that are like the carbon versions, but a little different.
Like silicone rubber.
If organic chemistry is based on carbon and what mischief it can get up to (and it is), then silicones mimic it, in a way. One thing you can make with silicon is a form of rubber. This rubber is even better for some things than the rubber made from carbon. It's flexible and mostly inert, like real rubber. But it's also heat resistant, to the point that it can be used for spark plug covers. They get hot. But so do baking utensils.
OK, there, we have an "Aha!" moment. Someone started making cake pans and other baking utensils from silicone rubber. And liners for muffin tins.
Which brings us up to date, because I'm talking about rubber muffin tins today.
I think it was Dan Ladigan's and Mike Clelland's book "Lighten Up!" that first inspired me to try steaming food on the trail. Briefly, what you need is a wide, shallow pot, some pebbles in the bottom, or a hardware cloth tray, food, and a bit of water.
Steam is especially efficient at transferring heat into food, much more so than water, because to get steam you need to heat only a little water, and as the steam condenses when it hits relatively cold food, it transforms from a gas back into a liquid, and gives off huge amounts of heat. To boil food instead, first you have to cover the food (takes lots of water), then you need to boil the water. Then when you're done, you throw away all that hot water.
Inefficient, unlike steaming.
For steaming, you still need to boil water, but you need to boil only a little.
So I tried it. Worked fine. Only one problem: what to put the food in while it cooked. I made some tiny muffin tins from cut down aluminum cans, and they worked, but were easy to over fill, and they overflowed as they cooked and the batter rose, so then I had extra cleanup duties. Usually when I cook I heat water and then add it to food in a zip lock bag, and carry the bag home with me. No cleanup at all.
Paper liners were too flimsy. I tried steaming food inside plastic bags, and that worked, but it was hard to keep the bag away from the sides of the pot. The bags melt on contact, and it's not good to eat melted plastic.
So that idea kind of sat.
Until now.
I've tried some silicone rubber muffin cups. Great. So far I've used them at home, but they should do fine on the trail. They are stiff enough to stand up, and big enough to hold a decent amount of batter, and the food doesn't have to be anything fancy.
Cleanup is easy. On the trail it should be workable to simply put the cups away without cleaning, inside an odor proof bag, and let them sterilize themselves at the next meal, but they are simple to clean. If you get a muffin fully cooked, and work with only a bit of care, the cooked muffin pops out without leaving chunks of itself stuck in the cup.
At home, some warm water, detergent, and a bit of rubbing gets them clean. All you need to do is let the cups air dry and pop them back into the cupboard until next time.
Here's what I've tried so far for seven muffins, which about the right number for the rice steamer someone gave me.
Corn meal: 8 tablespoons
Milk powder: 6 tablespoons
Baking powder: 1/2 to 1 teaspoon
Sugar or honey: 1/2 to 1 teaspoon
Oil: 1 tablespoon
Fruit, usually raisins
Mix the dry ingredients, then add the oil and mix thoroughly. Add water, maybe 1/4 cup or less, and mix thoroughly. Spoon into the silicone cups, then add raisins, which will sink down into the batter as the muffins cook. Steam throughly, and let sit in the warm pot for awhile.
Other fruit works too, besides raisins. Chopped apple is great. Today I chopped some canned peaches, and they were fine too. Raisins rehydrate as they cook, and get squshy soft.
The baking soda puffs up the muffins. The oil adds calories and seems to toughen the corn meal and make it more like well-kneaded bread. I think the oil also reduces the corn meal's natural bitterness and makes the taste smooth out.
Other ground grains should work too, but I haven't tried anything else yet.
On the trail I'd take everything pre-mixed and add water, then knead it all inside a bag, and use the bag to squeeze batter into the cups. Steaming in a wide pot should work fine, since the silicone cups stand up by themselves, and are small enough so I think I could get three or four into my Wal-Mart grease pot.
If you don't have one, you might be able to find them in your area, though around here it looks like Wal-Mart is no longer selling them. KMart is selling one though, better than the original, and I might buy one and check it out. But any pot that's big enough will work fine.
And the cool thing is that steaming works well over a small alcohol stove. I've done it. It takes more fuel than simply heating a cup or two of water, but not a huge amount more, and the steaming gives a person a lot more flexibility in preparing food.
References:
Wal-Mart silicone muffin cups (The web site says it's online only but I got mine in a store, for about $2 less than the online price.)