
What does a Frenchman find when he goes snooping the internet?
The following is an edited discussion around the work of Pierre Dumay, from www.randonner-leger.org. The original, in French, is at L'Atelier des Bricoleurs [Vêtements] le P.A.P (Peyo Abri Poncho).
If you want an English translation of the full thread, try The Handyman Workshop [Clothes] P.A.P (Peyo Abri Poncho).
I'm posting this because
- I like it.
- It's old, in internet years, and could vanish completely at any moment.
- It's clever — shows good thinking.
- I can't get it out of my head.
- I want to make a cloak like this and extend it to a full shelter system.
- And, let's not forget Scary Karen. (I definitely like her spirit.)
Most of the content here belongs to others, but let's consider this an act of preservation. The quality of the images is bad enough now — guess how hard they'll be to deal with when they're gone entirely.
So let's go then, let's learn about the P.A.P., the Peyo Abri Poncho (or, in English, the Peyo Shelter Poncho / Peyo Poncho Shelter), starting with Pierre "Peyo" Dumay's first comment.
Peyo 11-01-2006 23:42:46
As you may know, I just finished sewing a tarp. Its dimensions are 160X260 and weighs 200 grs (silnylon) [Measurements: 160x260 cm = 63x102" = 5'3"x8'6". Weight: 200g = 7.1 oz. ]
A tarp is good but to gain weight should think of multiple use for the same article.
In this respect the poncho is a beautiful invention because it serves as rain gear, sursac (back) and tarp for the bivouac. [Sursac is literally an "outer bag", or maybe a "bag cover" or "splash bivy", or just "bivy sack", in this case a waterproof one.]
I have long had poncho-tarp views at Backpackinglight.com. In silnylon they offer everything I just mentioned.
But besides the price that hurts, these poncho-tarp have the huge disadvantage in my eyes to have a hole (well yes the hood) in their middle when they pose tarp.
It's obvious...
Certainly a hood can close effectively by twisting its cord around. The hole is no longer a problem therefore (or when setting the tension tarp anyway).
I was ready to take the plunge, grab my scissors and make a nice circular hole in my new tarp.
Yes but here ... I had to solve a preliminary technical problem: how to sew cleanly and efficiently a hood while at its base it was circular?
I started to sew (with machine) for a little less than a year and that I still do not know how to do it.
Then there was the problem of the size and the resistance of the hood.
Finally, the sewing and of course the application of a silicone coating on the seam had to be superbly done to avoid that I find myself in a big puddle during my bivouacs in the rain.
So many pitfalls that made me look for an alternative solution (and just as much, if not lighter).
I had thought of fixing the tarp on my skull with various methods, but none were effective.
I found a good track with a thread on the Backpackinglight.com Forum.
And especially on this page. (Even if the lady scares me. wink)
So here I am tonight doing tests.
The tutorial of the second site did not suit me but it allowed me to follow my own way that I will deliver you in image and that I will make mine for my future hike.
Step 1:
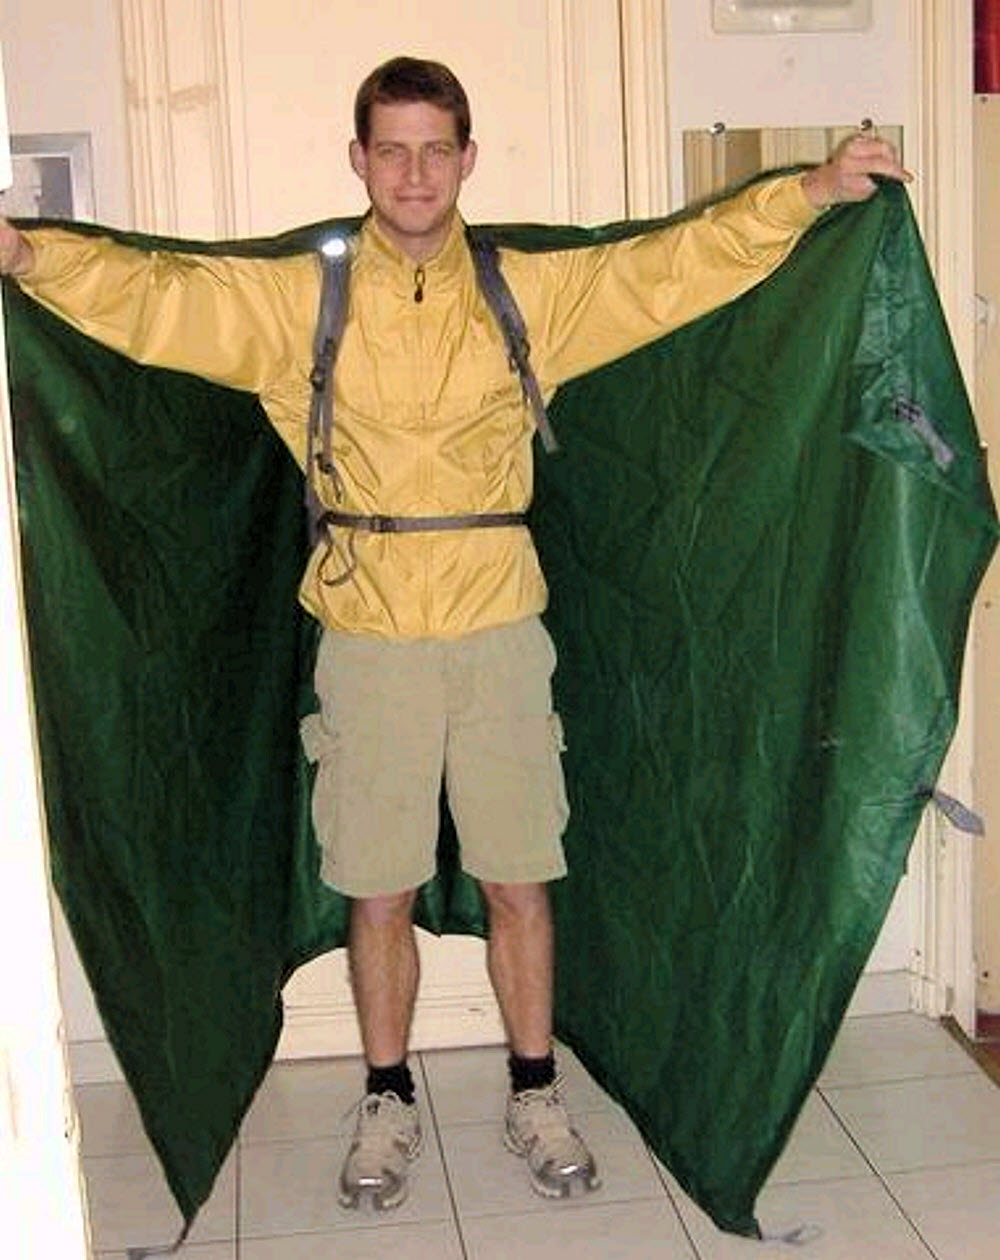
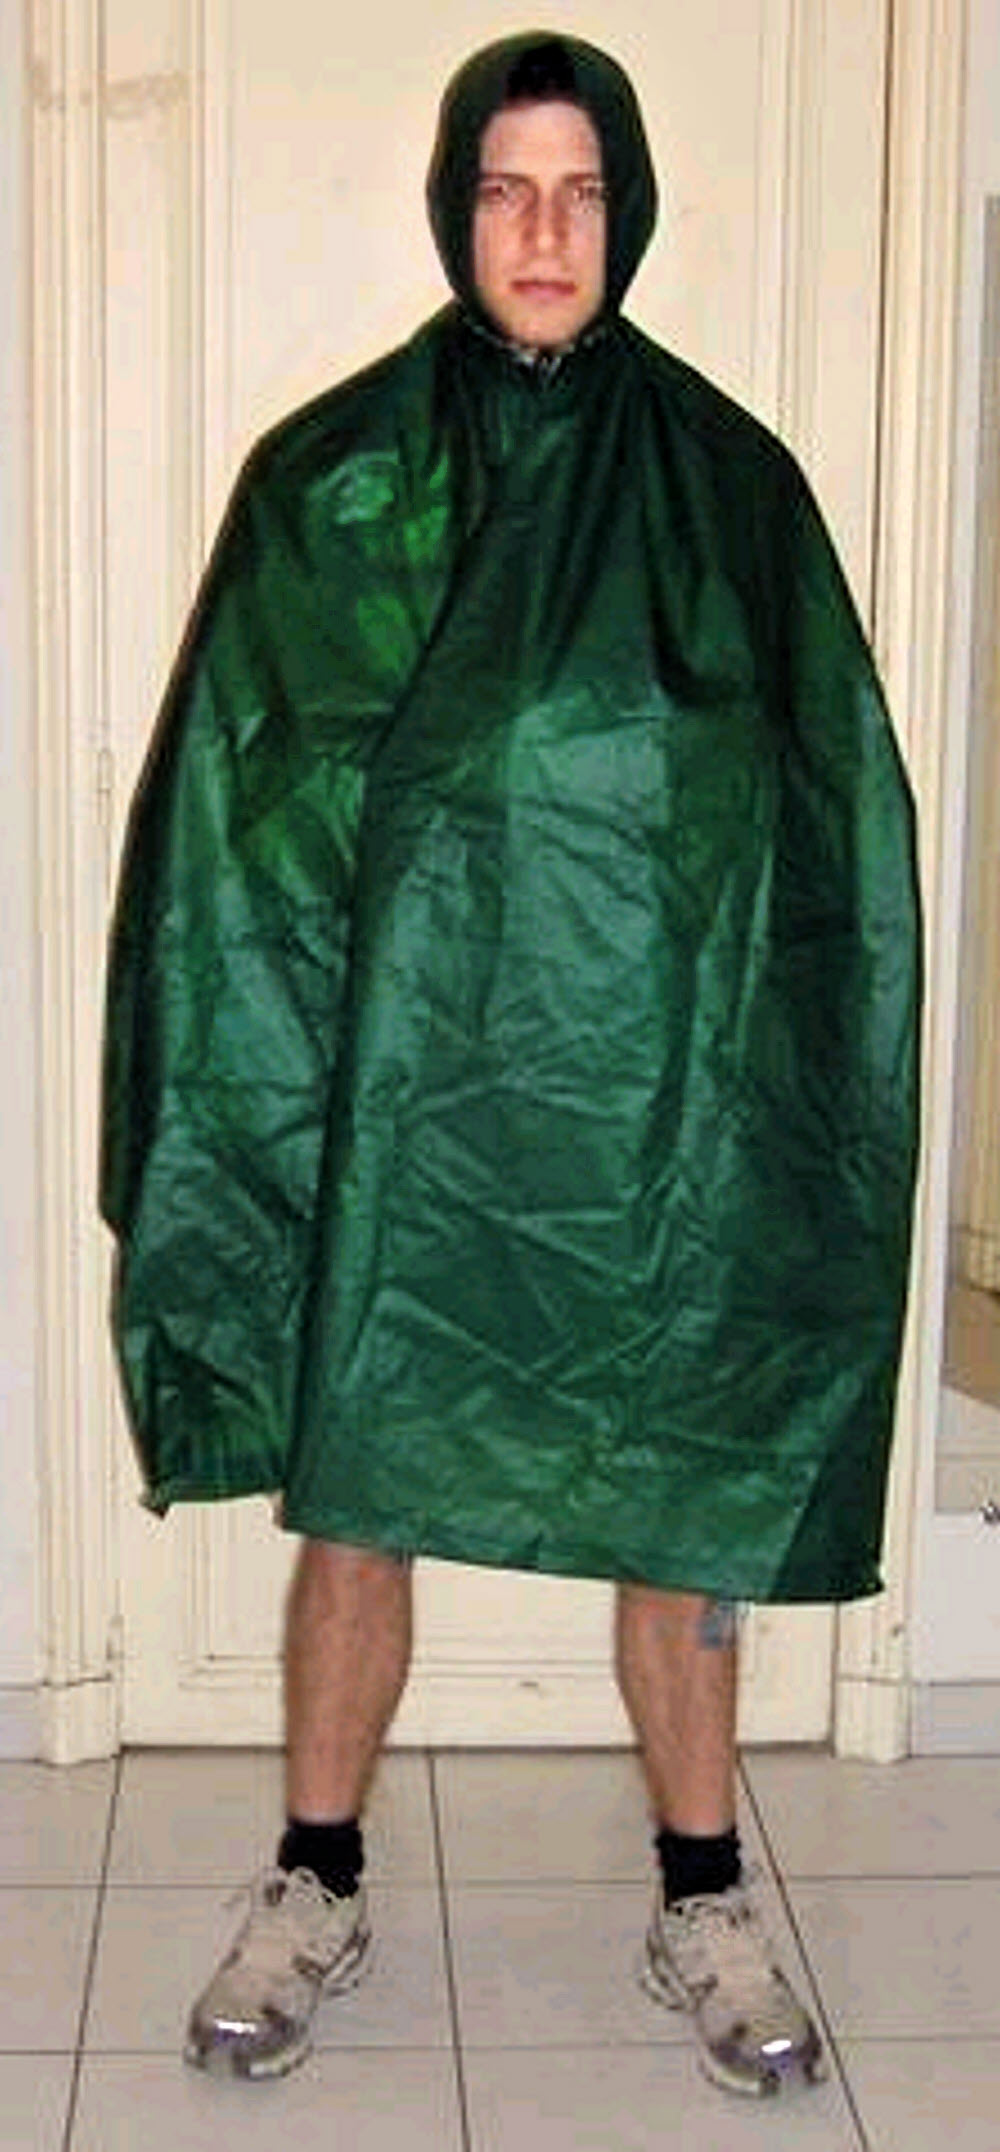
The tarp rests on my head in its middle on its longest side (260/2 = 130 cms of each side) [51"] and as I am 173 cms [68"] the 2 back angles drag.
To avoid this I grab the two back angles at the straps.
Ready, set, um...
And I pass these straps in the chest strap of my backpack (as in hiking I do not walk so sporty with my bag is not a problem). The angles are no longer dragging.
Grab the rear corners...
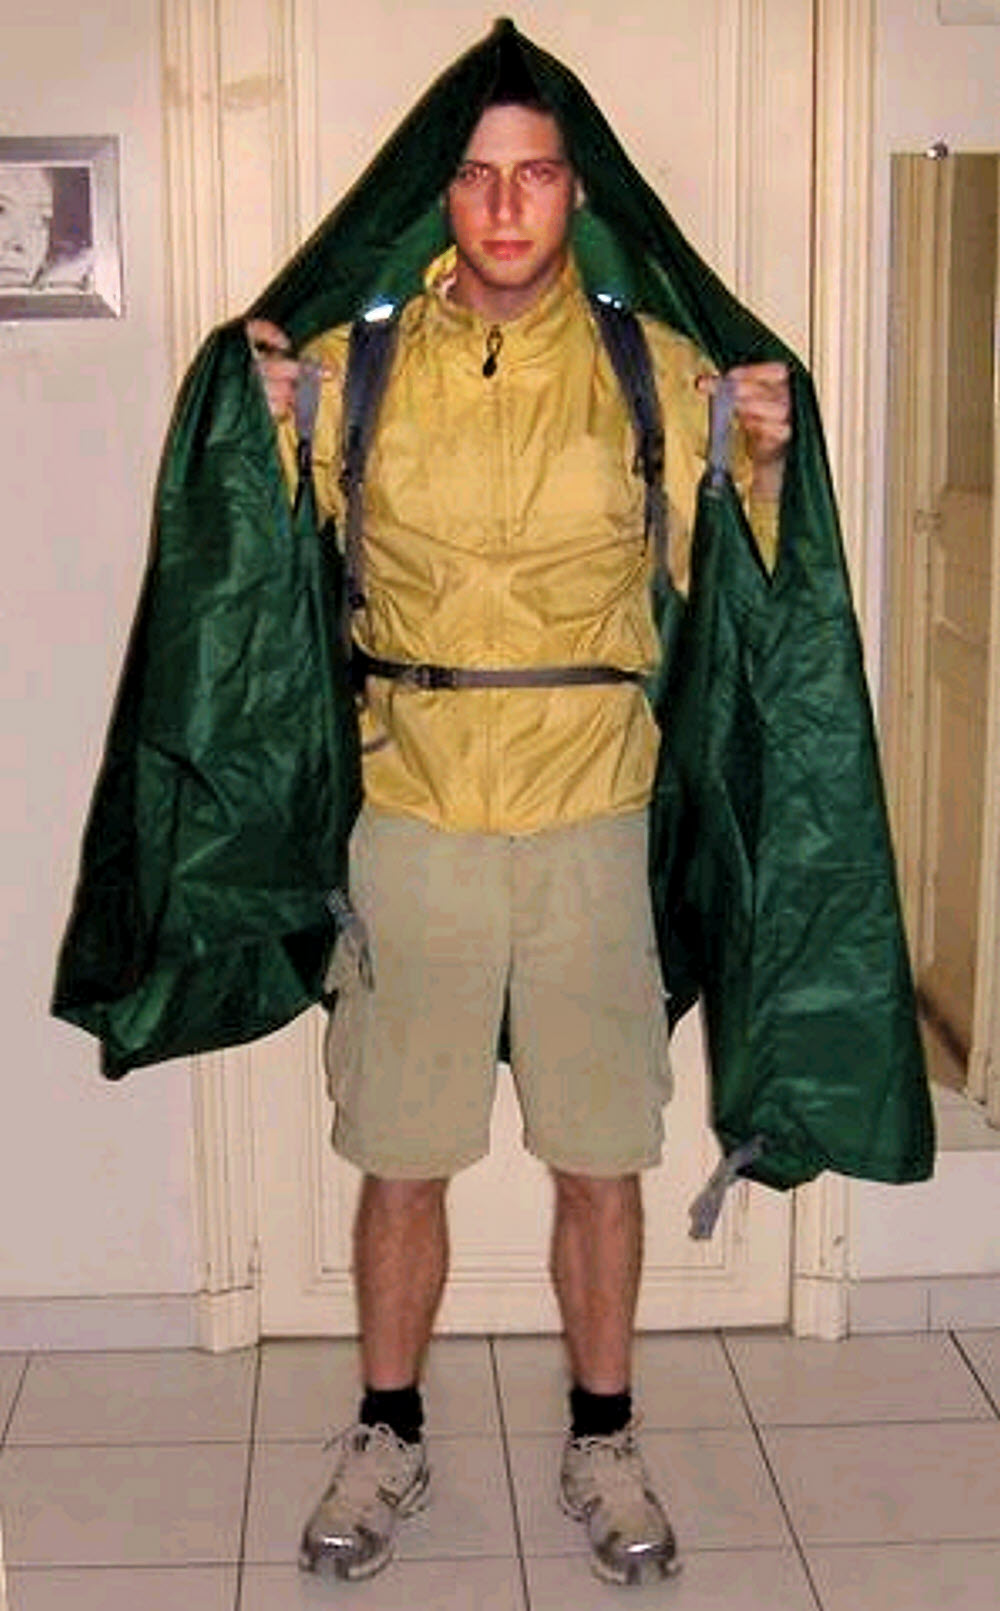
2nd step:
Now it is necessary to effectively close the system and especially to form a hood that will hold well even with wind or at a good pace.
For this you have to use a simple lace and a tankka (a blocker to push as on jackets or sleeping bags).
We draw the fabric well on the head (practice in hiking because during the establishment the walker is protected!) And we put the lace with the tankka around the neck.
And attach them to the sternum strap...
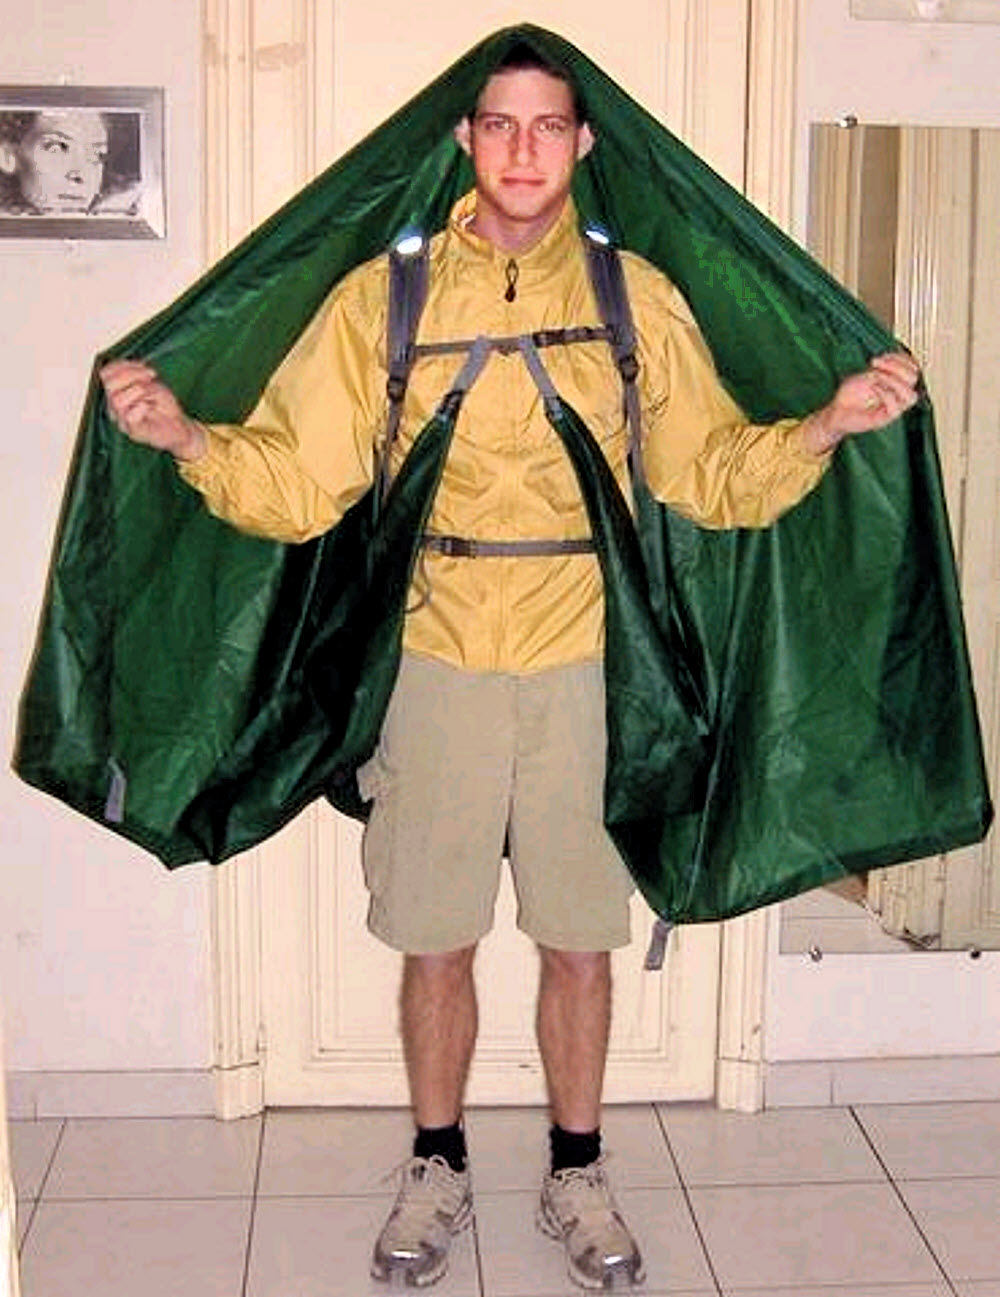
We get up to adjust the cord and hood (playing on the cord and the fabric we can make a hood at his will, a small back and here is a visor) (God, I look stupid ... That's good because it's you! wink )
For those who fear a potential throttle, know that we do not need to tighten too much and that the lace fits perfectly inside the poncho (thus avoiding inadvertent snapping)
Then adjust the hood...
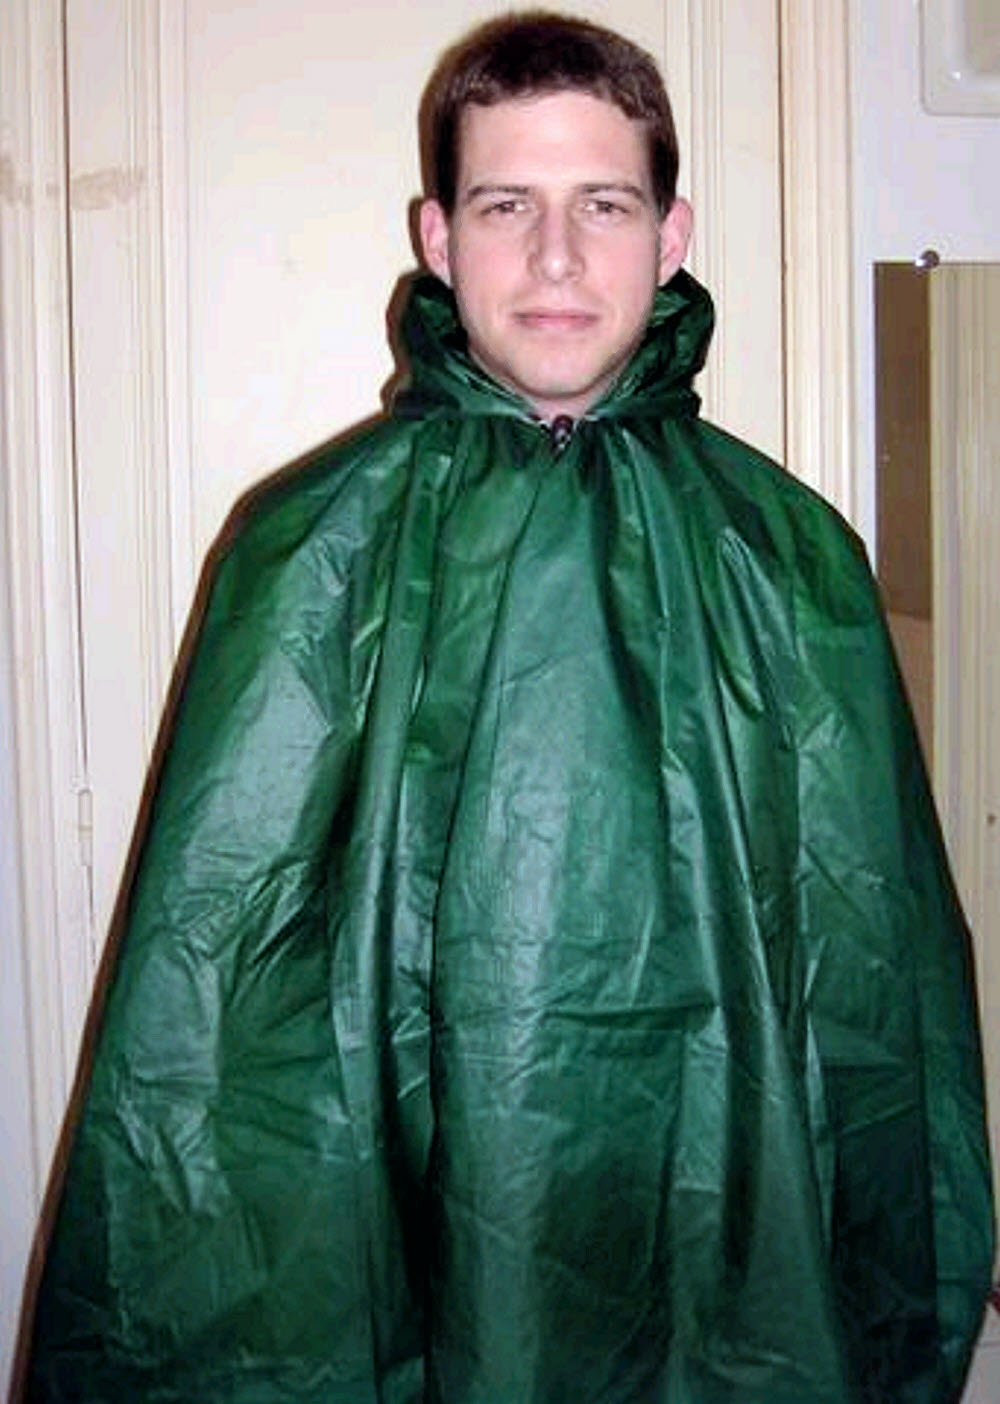
Here is the hood and the poncho are finished! (dressing time less than a minute)
Not a single seam so no escape.
Of course the front is not completely closed but there are two advantages: we can take out the arms if we fall and the fabric folds away against the sides ensuring good resistance to water inlets (it can even be wedged under the shoulder straps of the bag)
In any case, this PAP is made to be used with a jacket windproof and water repellent when there is heavy weather.
But we will gain significantly weight (and money) by taking a jacket that does not need a membrane / coating machine-bidule.
In this case a jacket Pertex Quantum (just water repellent) is perfect for a hike 2/3 seasons (100 grs). [3.5 oz.]
Then wrap yourself in it...
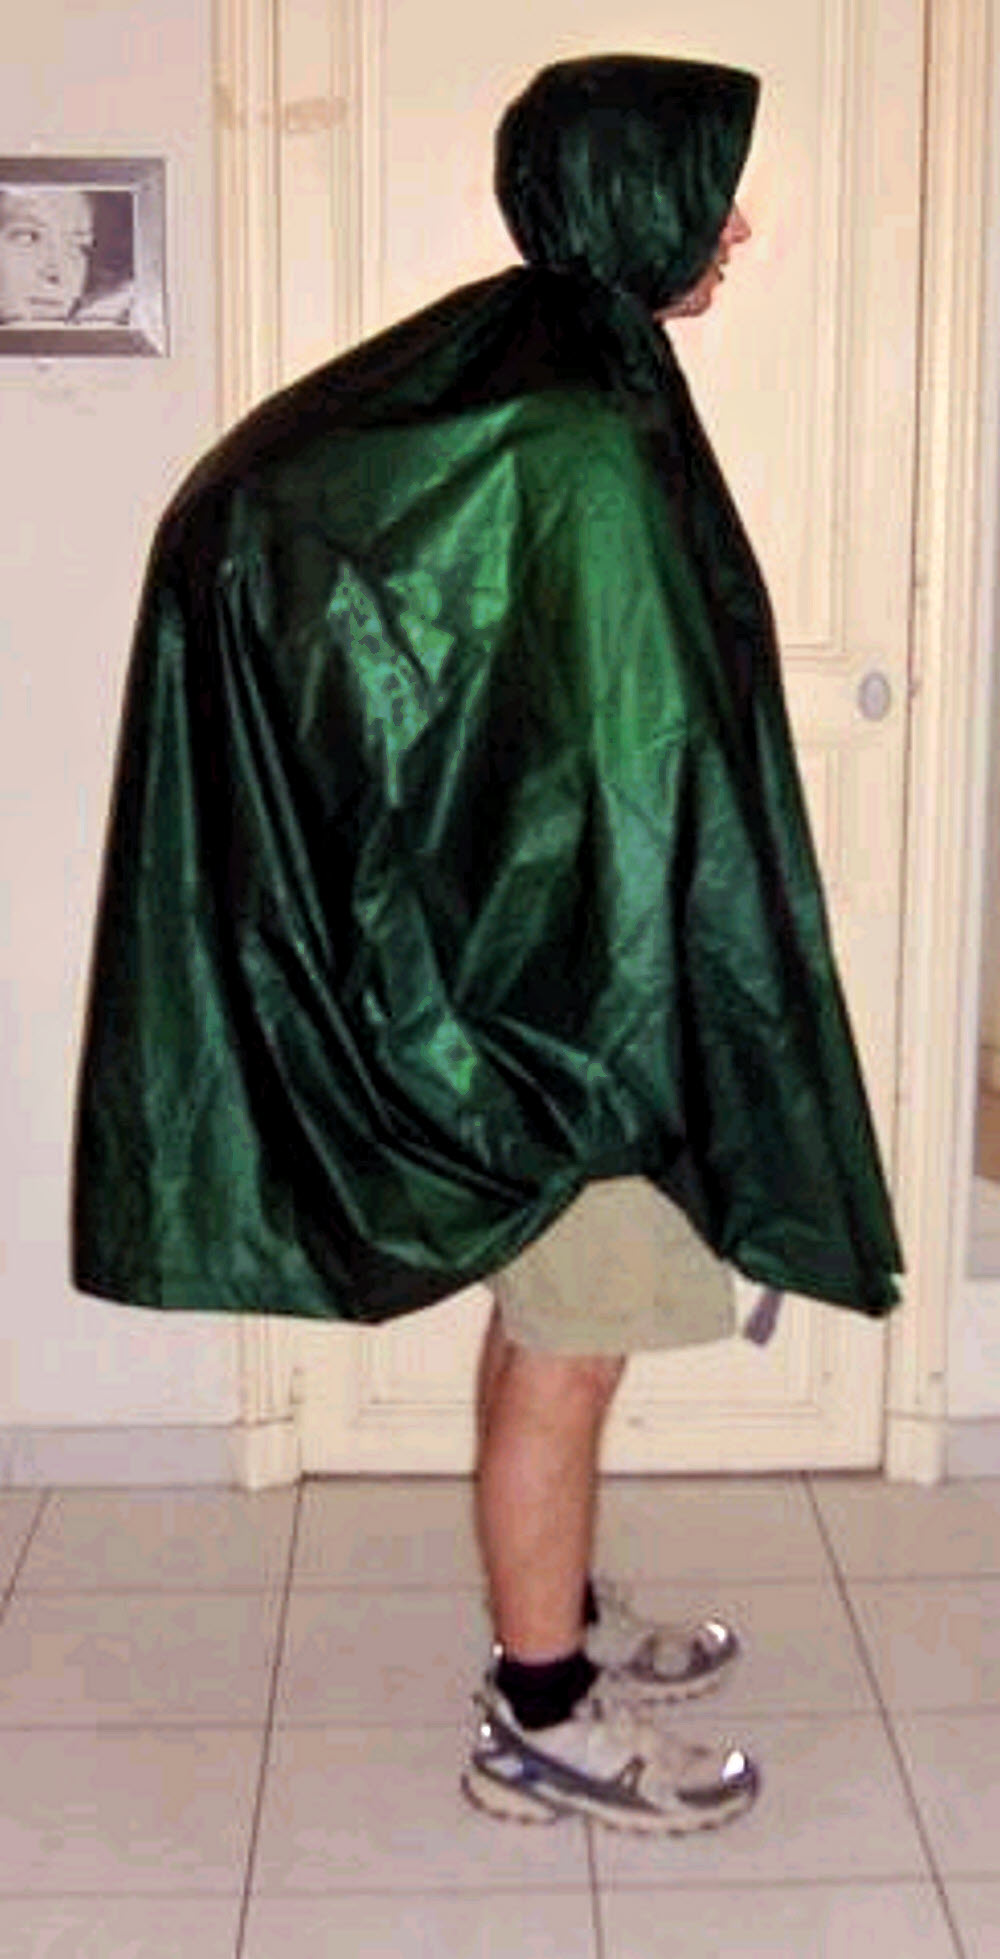
Here a profile view. What more can you ask than to have a shelter, a rain suit (covering head, bust and mid-legs) and a [protected] backpack for all in all for 200 grs!
Take a look from the side, with a pack on...
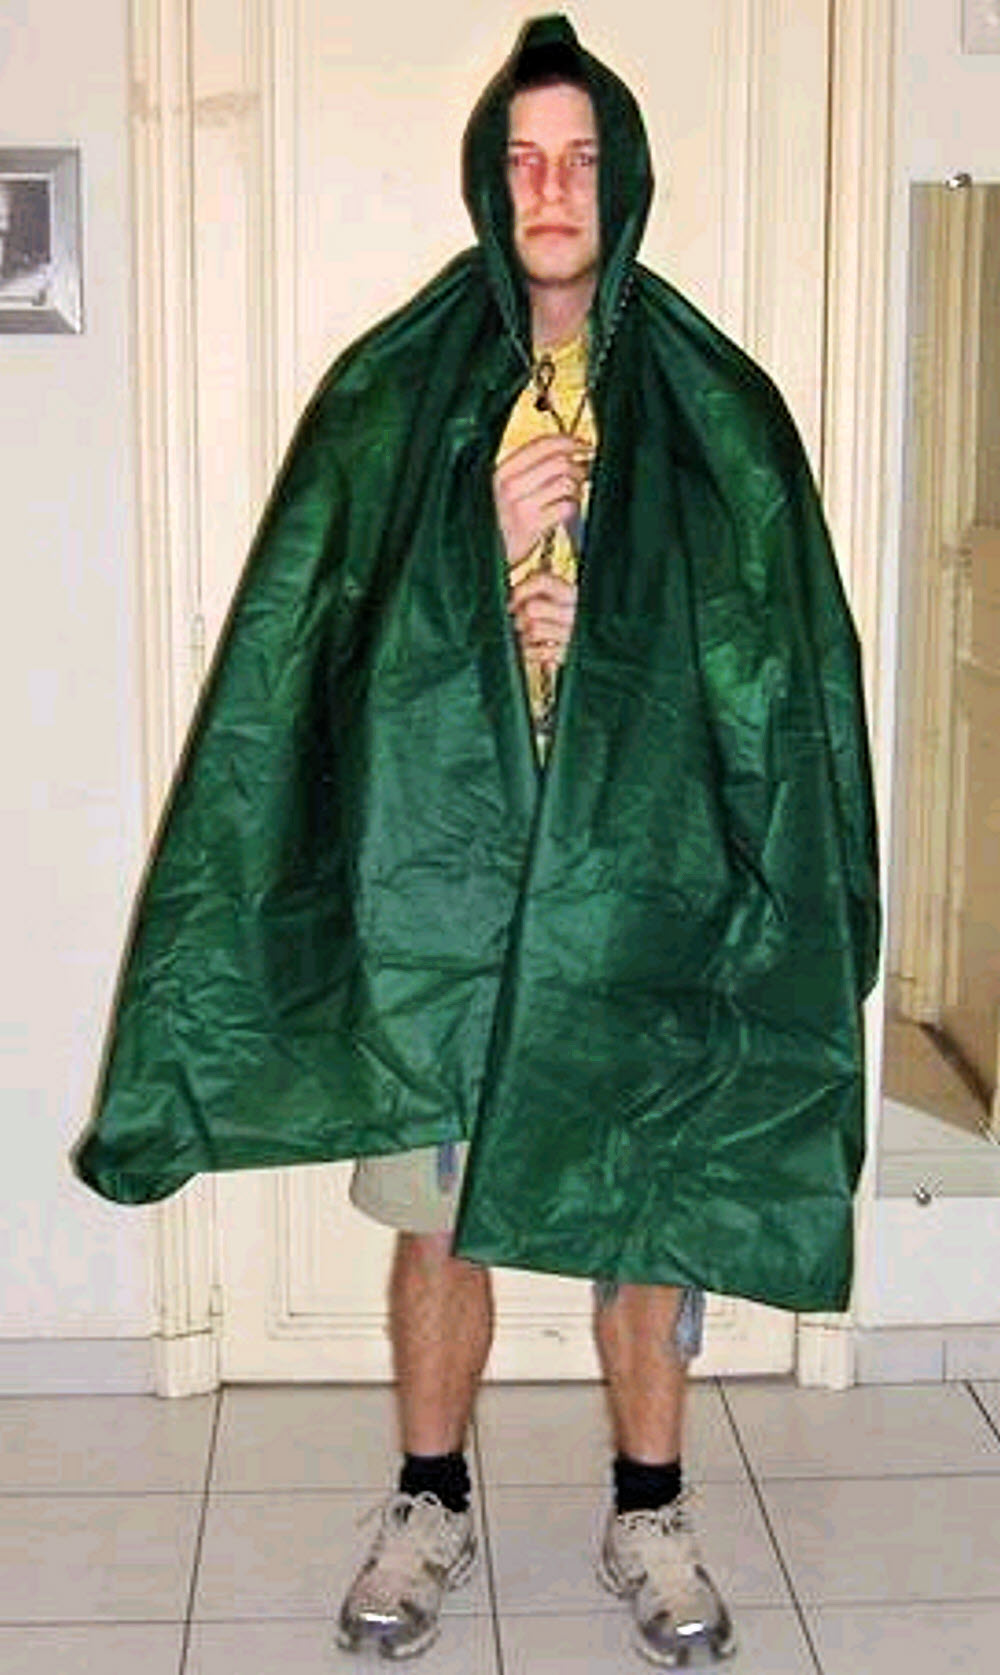
Here the Peyo quite happy with him (I know it's not good ... big_smile) but especially a nice view on the top closure with the tankka and the departure of the hood.
Besides with or without the hood this poncho is very good in the effort (test intensive gul [no idea what this word should be] with the bag on the back: nothing moves)
Looks tidy, dunnit?
That's it, I think it's squaring my circle in this matter ...
But I'm still looking (perhaps a small scratch at the front closure? Or a strap at the waist for better wind resistance).
Small detail, with a tarp as small I use a bivybag (sursac bivouac) but the Pertex 5 is in command for a sursac even lighter. To follow then.
Ciao
...
Peyo 12-01-2006 12:19:24
I consider 4 parameters that make me prefer this method.
1 / The total cost:
the end of silnylon cost me nothing (it was a gift). a jacket loss quantum about 55 euros (at CAMP) and my sursac had cost me 30 euros (they still do at Expe).
So rain suit and bivy protection for cheap.
2 / The big time
In bad weather, I totally trust my sursac and a poncho is a real insurance when you walk (the only technique not to be wet in my opinion).
When there is a lot of wind (and if rain) I do not climb the tarp but I literally put it on me by tying it with its stakes (or stuck with stones or wooden stakes carved on the spot)
3 / The weight:
- My PAP is 200 grams (go 210 with my kite rope guideline)
- the jacket in lossx quantum 80 grs in M at Camp (with hood and 1/2 closure)
- Support in silnylon 1.1 and quantum lossx (or grade 5) 6.5 oz (180 grs)
All this for 470 grs.
4 / Montage
It is clear that it is much more adaptable than a normal shelter, both at the field level (I have often been late looking for a place for my tent when there was room in some places for a sleeper), at the level of the will of the walker.
...
Peyo 06-05-2006 10:33:11
But honestly he could know some improvements that it would not bother (especially at the level of closure).
Now that I have Gatewood at Sixmoondesigns, it's true that I have something more comfortable.
...
Peyo 06-05-2006 11:25:44
Versatility, yes that's the key word.
The PAP is in silnylon so there is more resistant.
For improvement, it would be enough to make a closure with Velcro for windy days. After all is possible ...
...
"Original" photos (or as close as we're ever going to get).
Comments? Send email to sosayseff@gmail.com
See if that helps.